|
This Application is used entire and absolutely at the Users OWN RISK.
The Developer of this Application, not the Apple Corporation, not any associated legal entities with either part will accept legal liability nor moral responsibility for any misadventure, damage, injury or death arising from the use of this application or any derivative product.
The effectiveness of this application is largely governed by the configuration of your iDevice which is outside my control.
I am heavily indebted to a couple of Tutorials:
iCloud: timroadley.com/2012/04/03/core-data-in-icloud/
Thanks to Tim Roadley I used much of this tutorial directly, although I did remove a Async section which just did speed up the application startup, but led to a timing issue, otherwise it worked "out of the box".
MapView Customised Annotations. Asynchrony Solutions Blog's Custom Map Annotations Callouts - Part 1
This came to my rescue on dark night when Mapview stopped working in 5.1.1 builds. (It is only used in that build). There were some minor bugs in getting it to work well on a iPad mainly due to Map View being more flexibly used on a iPad, I hyper-spaced around the planet a few times, but eventually got it mostly under control.
I noticed an annoying bug just a couple of days before the app was accepted by Apple. When newly installed the Map Selector View will default to a place that was convenient to me during testing, unless you happen to use the location service on your device a lot already, it is meant to default to your location. This is a bug. You will need to manually zoom and scroll the map to your location, this should only be a problem the first time you use the application. Apologies, but my test devices all used their locations services a lot, so I did not find it earlier.
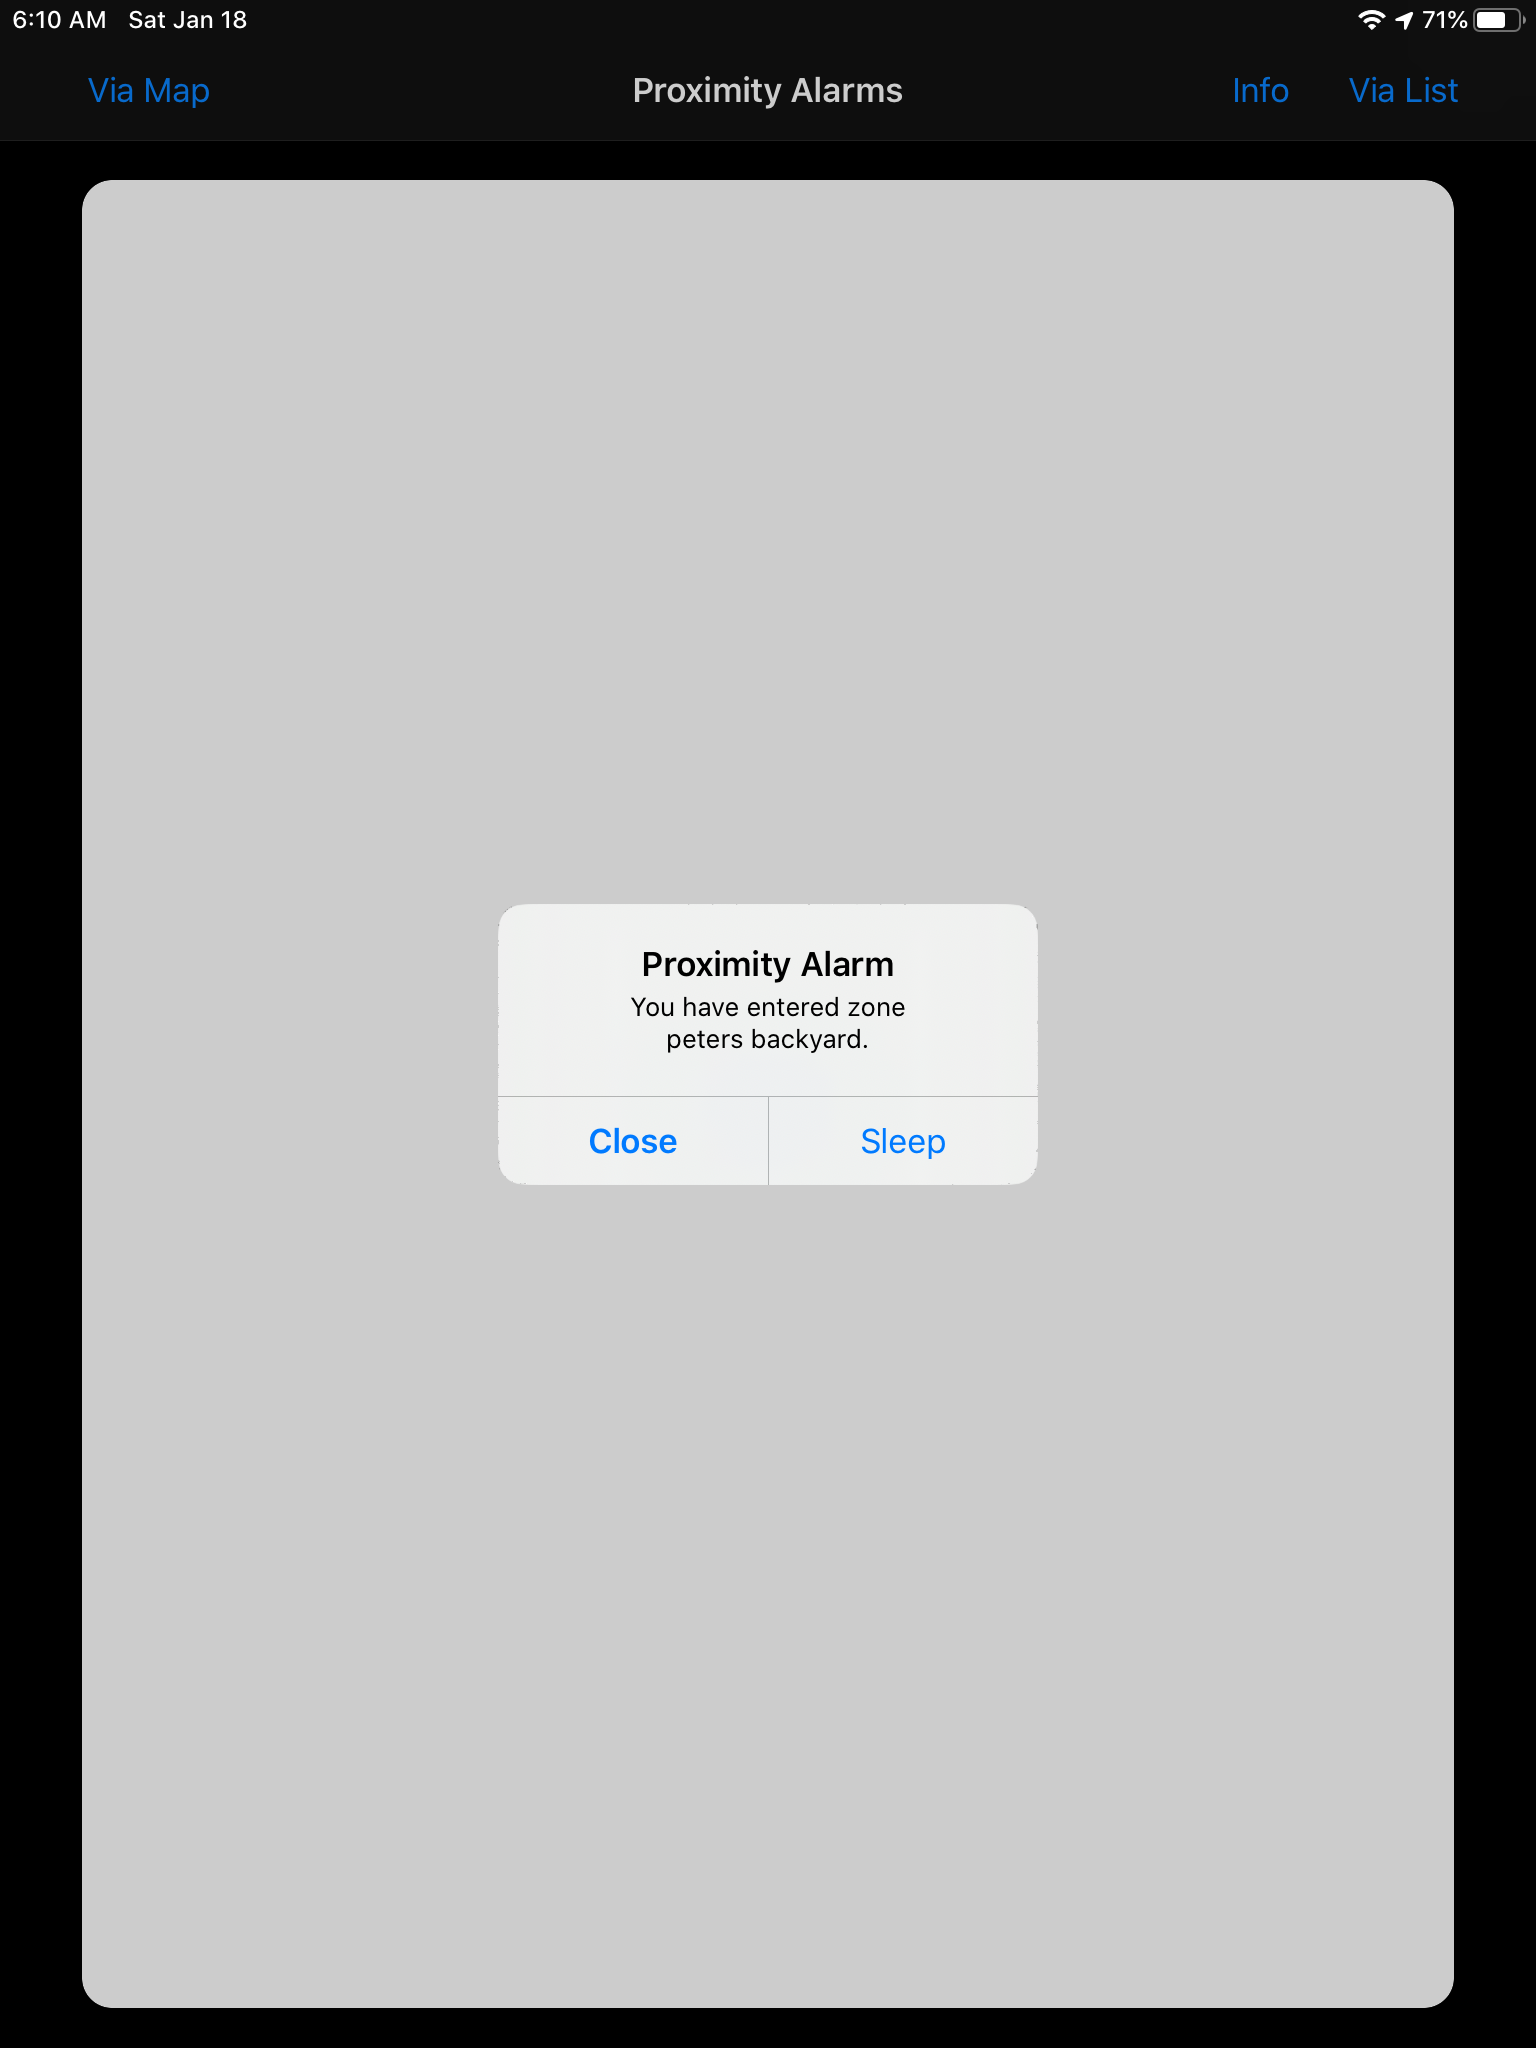
The application is like an Alarm Clock but the Alarm is triggered by you entering a Geographical area you defined.
The genesis of this application was orginally for walkers to avoid falling hazards, it makes no use of velocity or directional information, merely it considers if your current location is inside an alert zone. It is therefore not ideally suited to detecting entry of a high velocity vehicle entering into a zone. An alert distance, can be defined for an alert zone, if defined then an alarm is generated when within the alert distance of the alert zone, this was in part to deal with faster moving vehciles.
It has been suggested it may haveapplicability on airports, where there are a number of danger zones to be avoided.
But it could be used by:
Basically anyone who has some geographic location they want to keep away from or out off.
When you enter the Alert Zone, if your device supports Vibration your device can Vibrate, an Alarm Sound will be played, and an Alert Notification is presented. Unfortunately, all those things are within the power of a User to disable, so if it does not work as you expected you may need to tweak some Settings, particularly some Notification settings.
This application runs in the background once you have started it, you either have to explicitly terminate it as a background application or turn your phone off to make it go away. Fortunately you can turn off the alarm function with a single button click, in fact there only one button to click ! Unless you want to edit an alert zone.
When in the background the device depends on the Significant Location Service, due to a constraint imposed by Apple, it is not a navigation App, these means the application may only be notified of a new location, when you have moved more than 500m, and unfortunately when in the background there is not other stimulus to the application. This is a significant limitation on the application but I have had no choice in this matter.
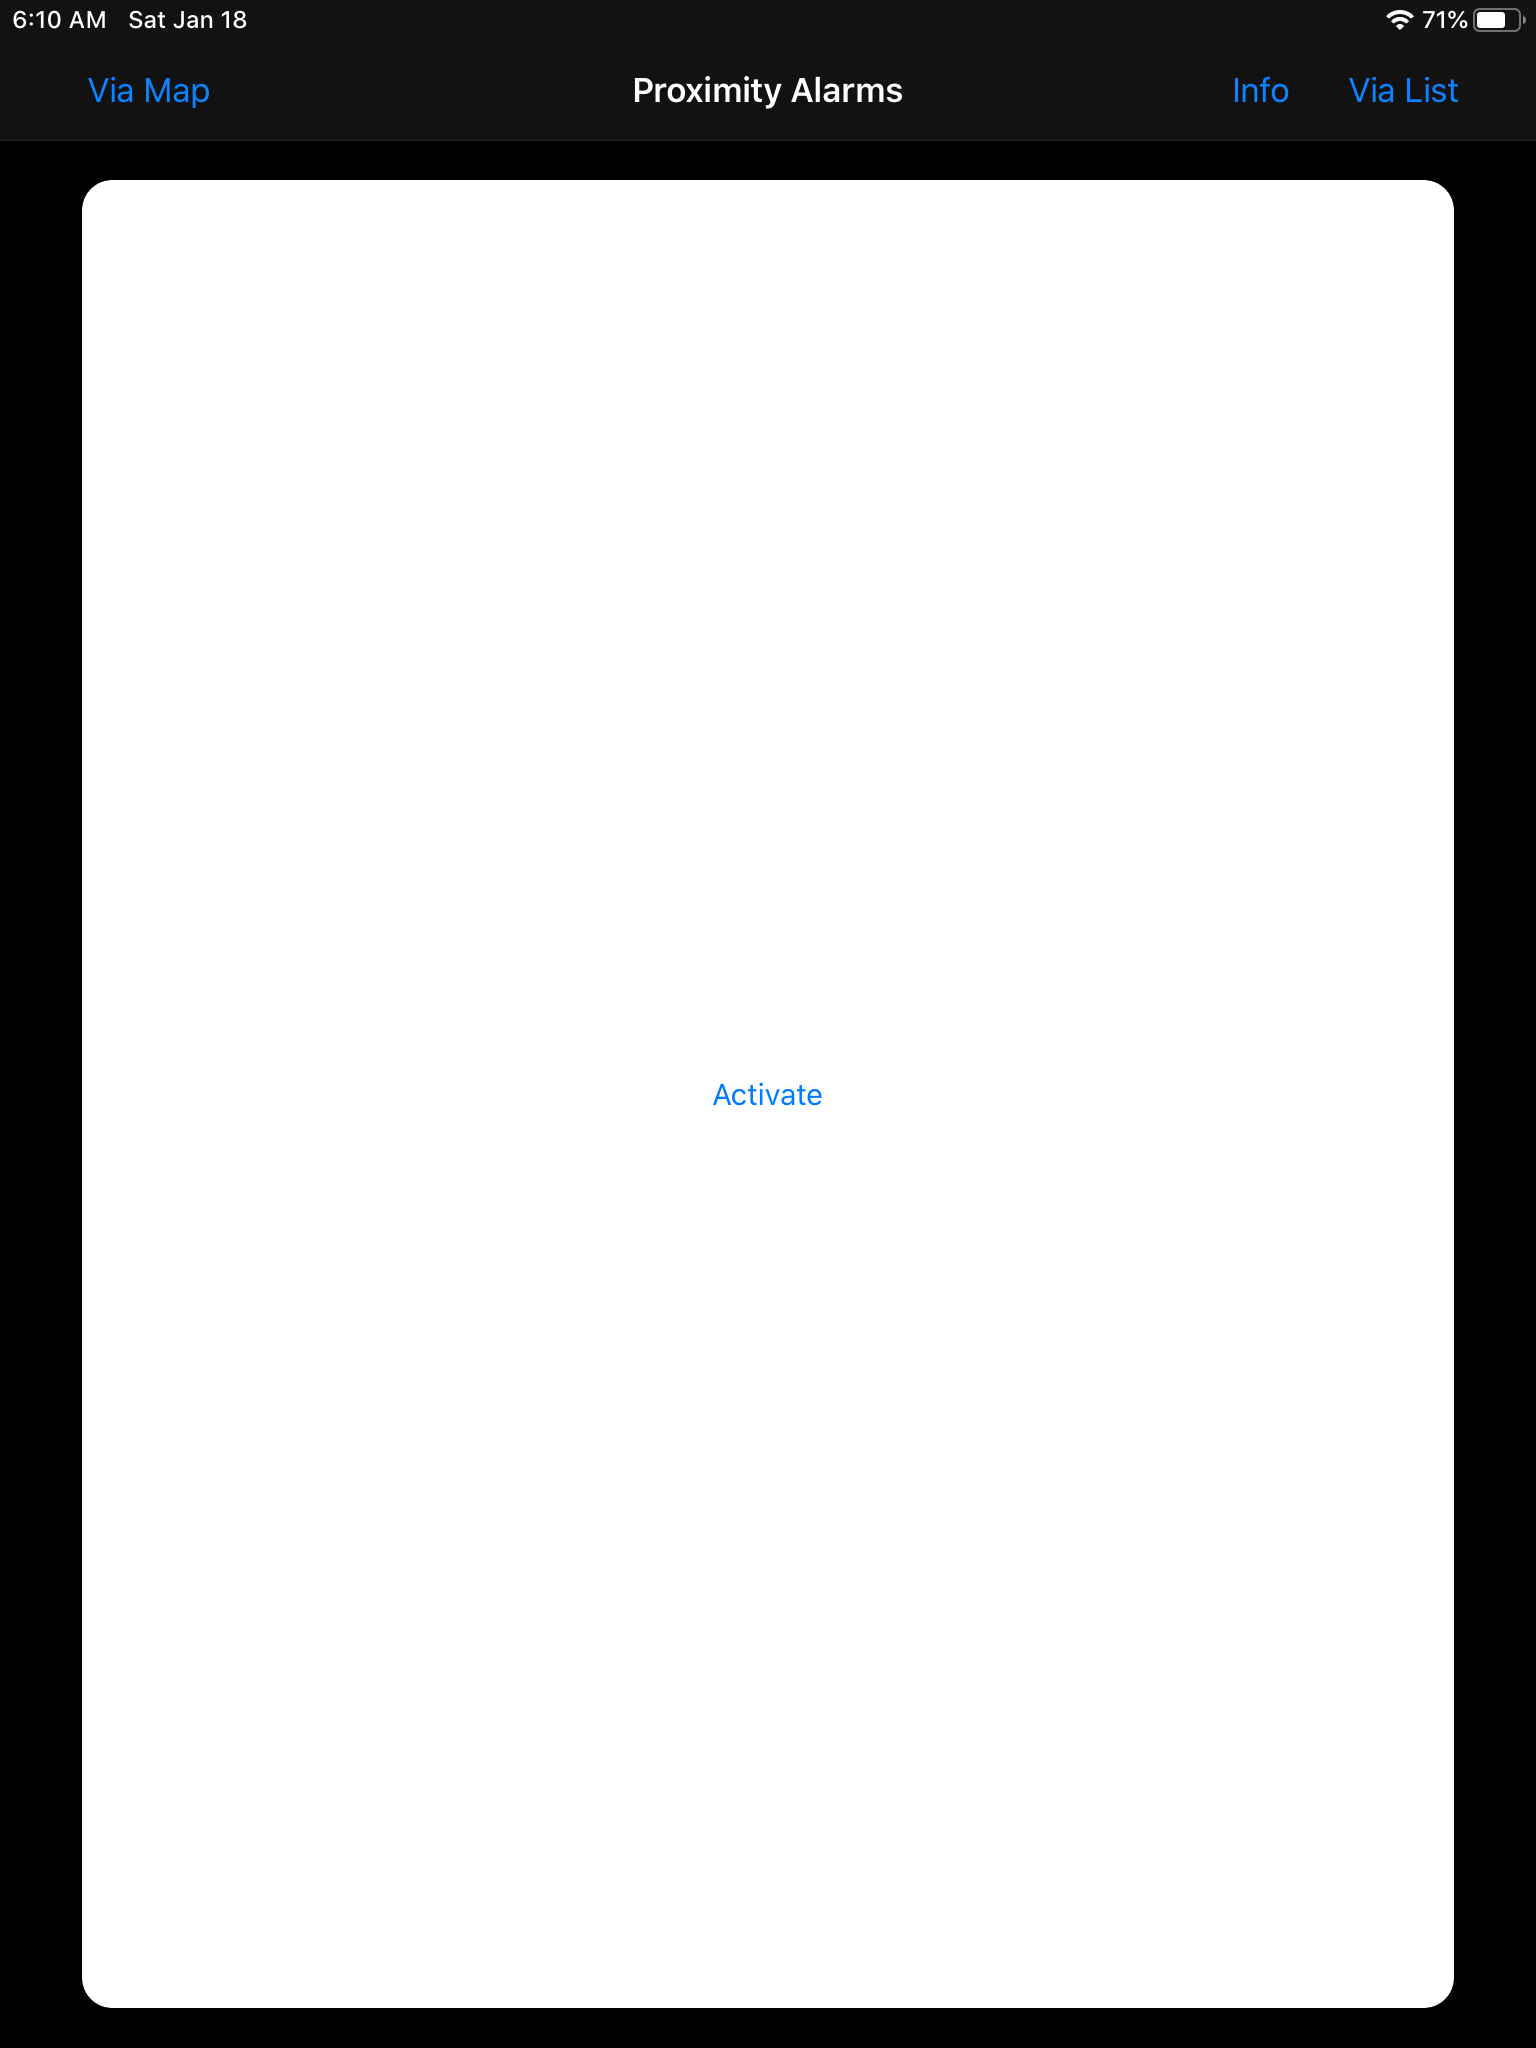
I have always wanted to write an application controlled from a single button, I have nearly done that.
The Proximity Alarms View has one large white button, the "Activate" button. I guess does the obvious !
Pressing the Activate button will:
Pressing the Deactivate button will:
These buttons allow you to configure Alert Zones.
The Information Button will bring up an abridged version of this description.

This is somewhat dependent upon the state of the Application.
The application will open to either the Proximity Alarm View to allow you to Deactivate the Alarm, or the Map Selector View with the Triggered Zone flashing depending on if you have selected the MAP bypass Switch ON in the Settings Application
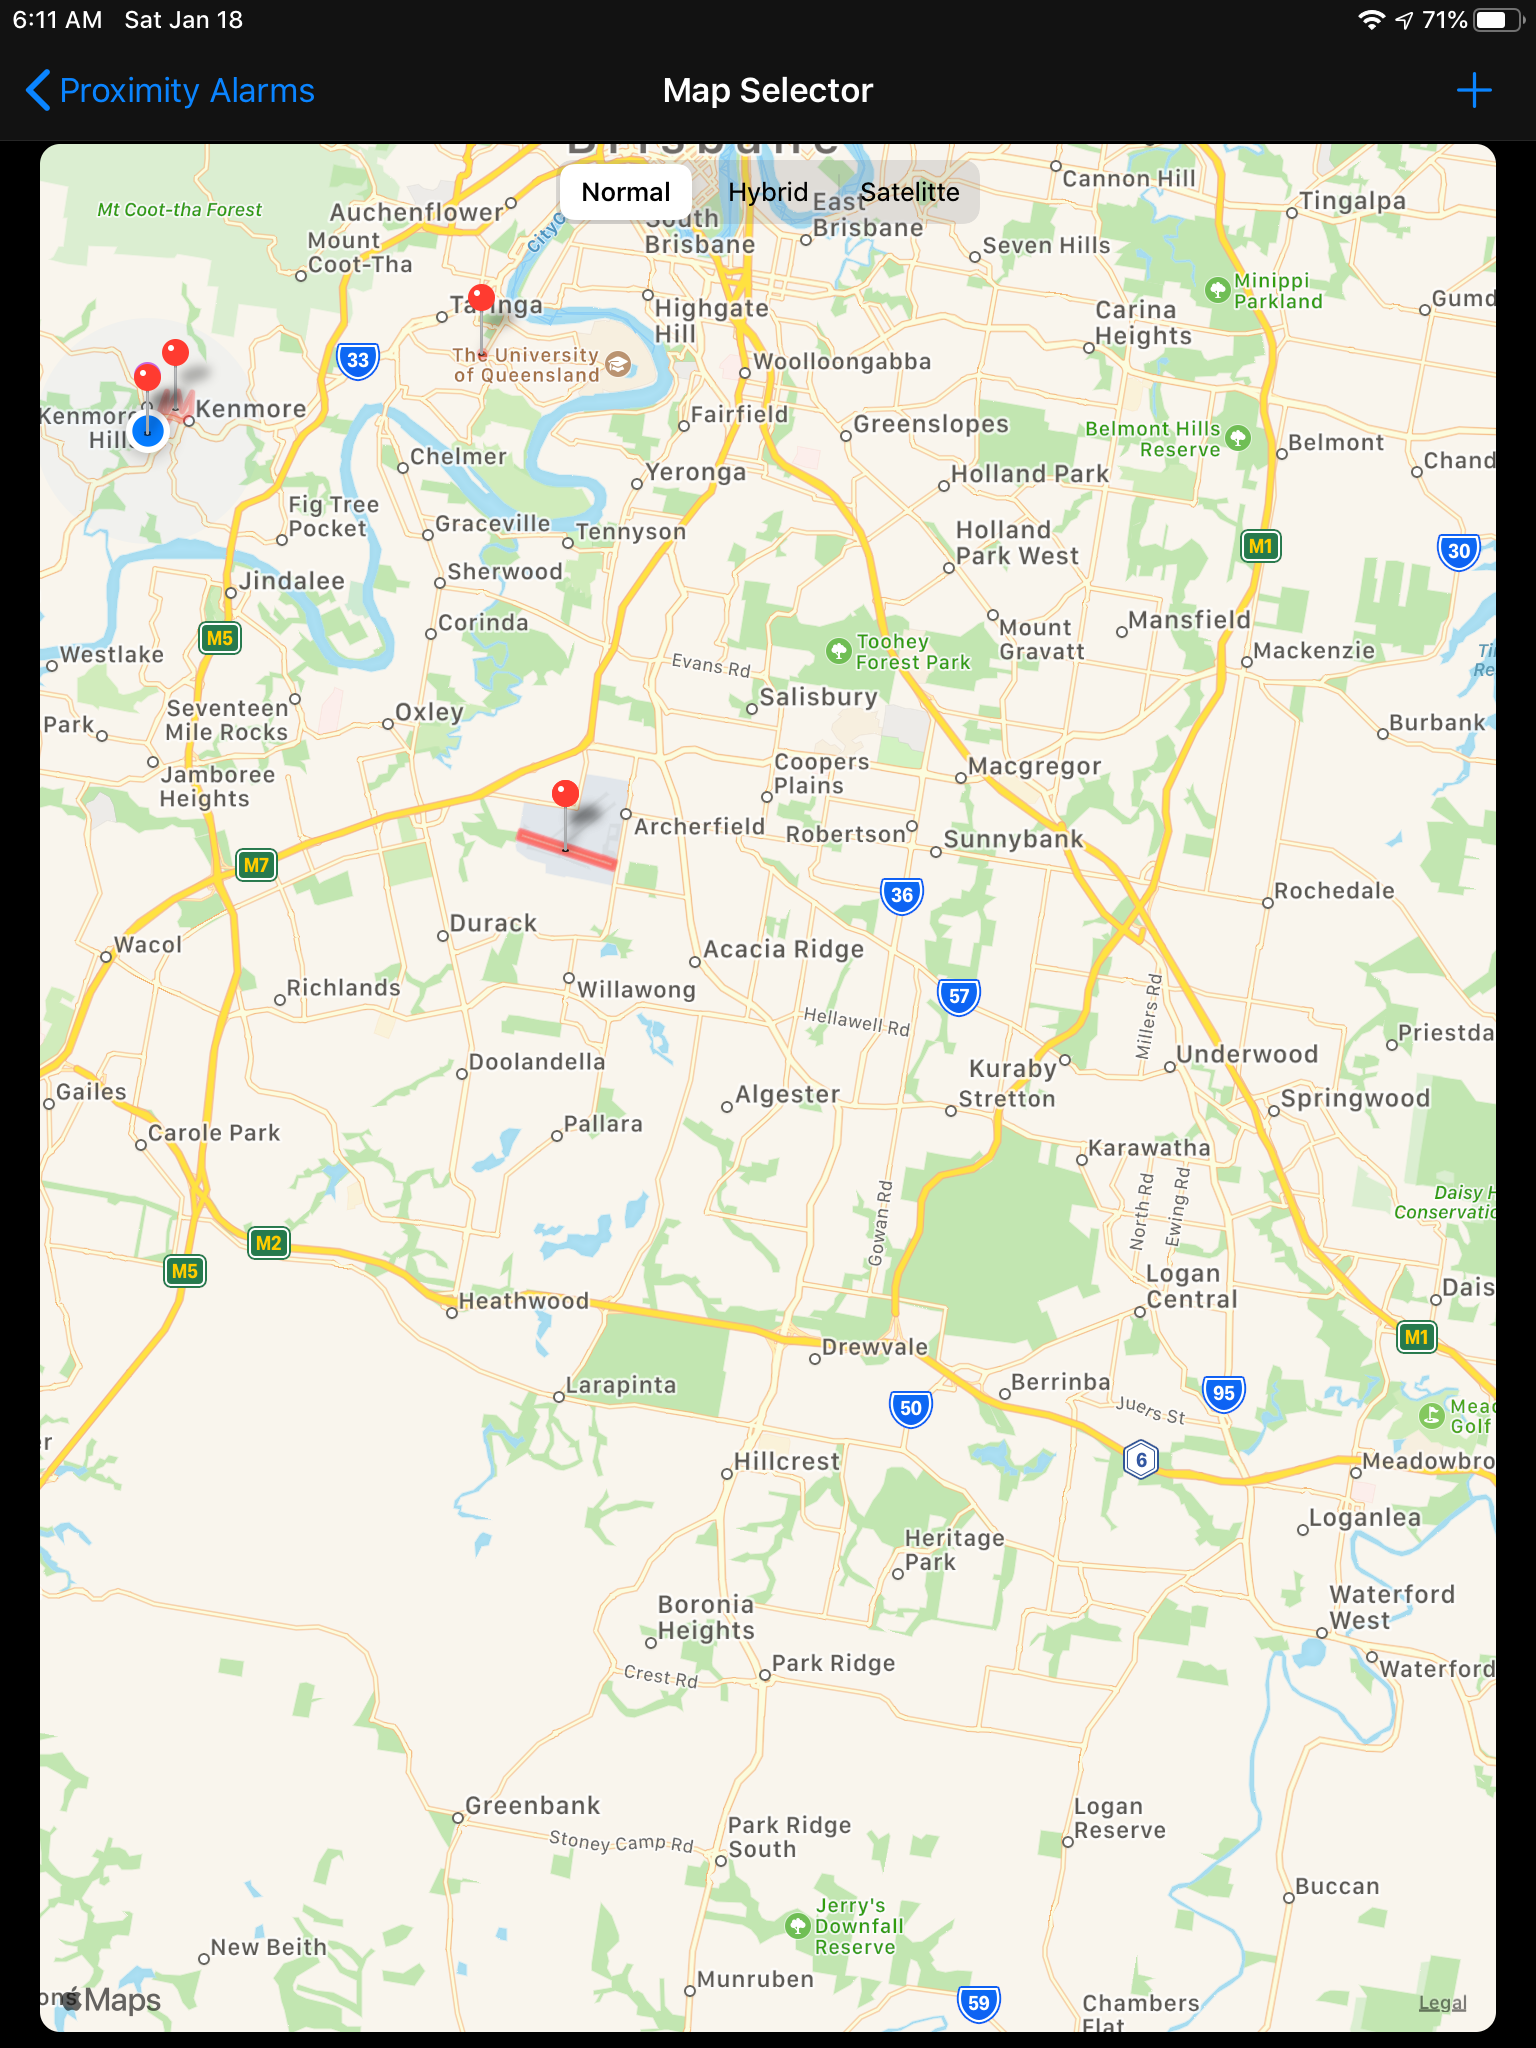
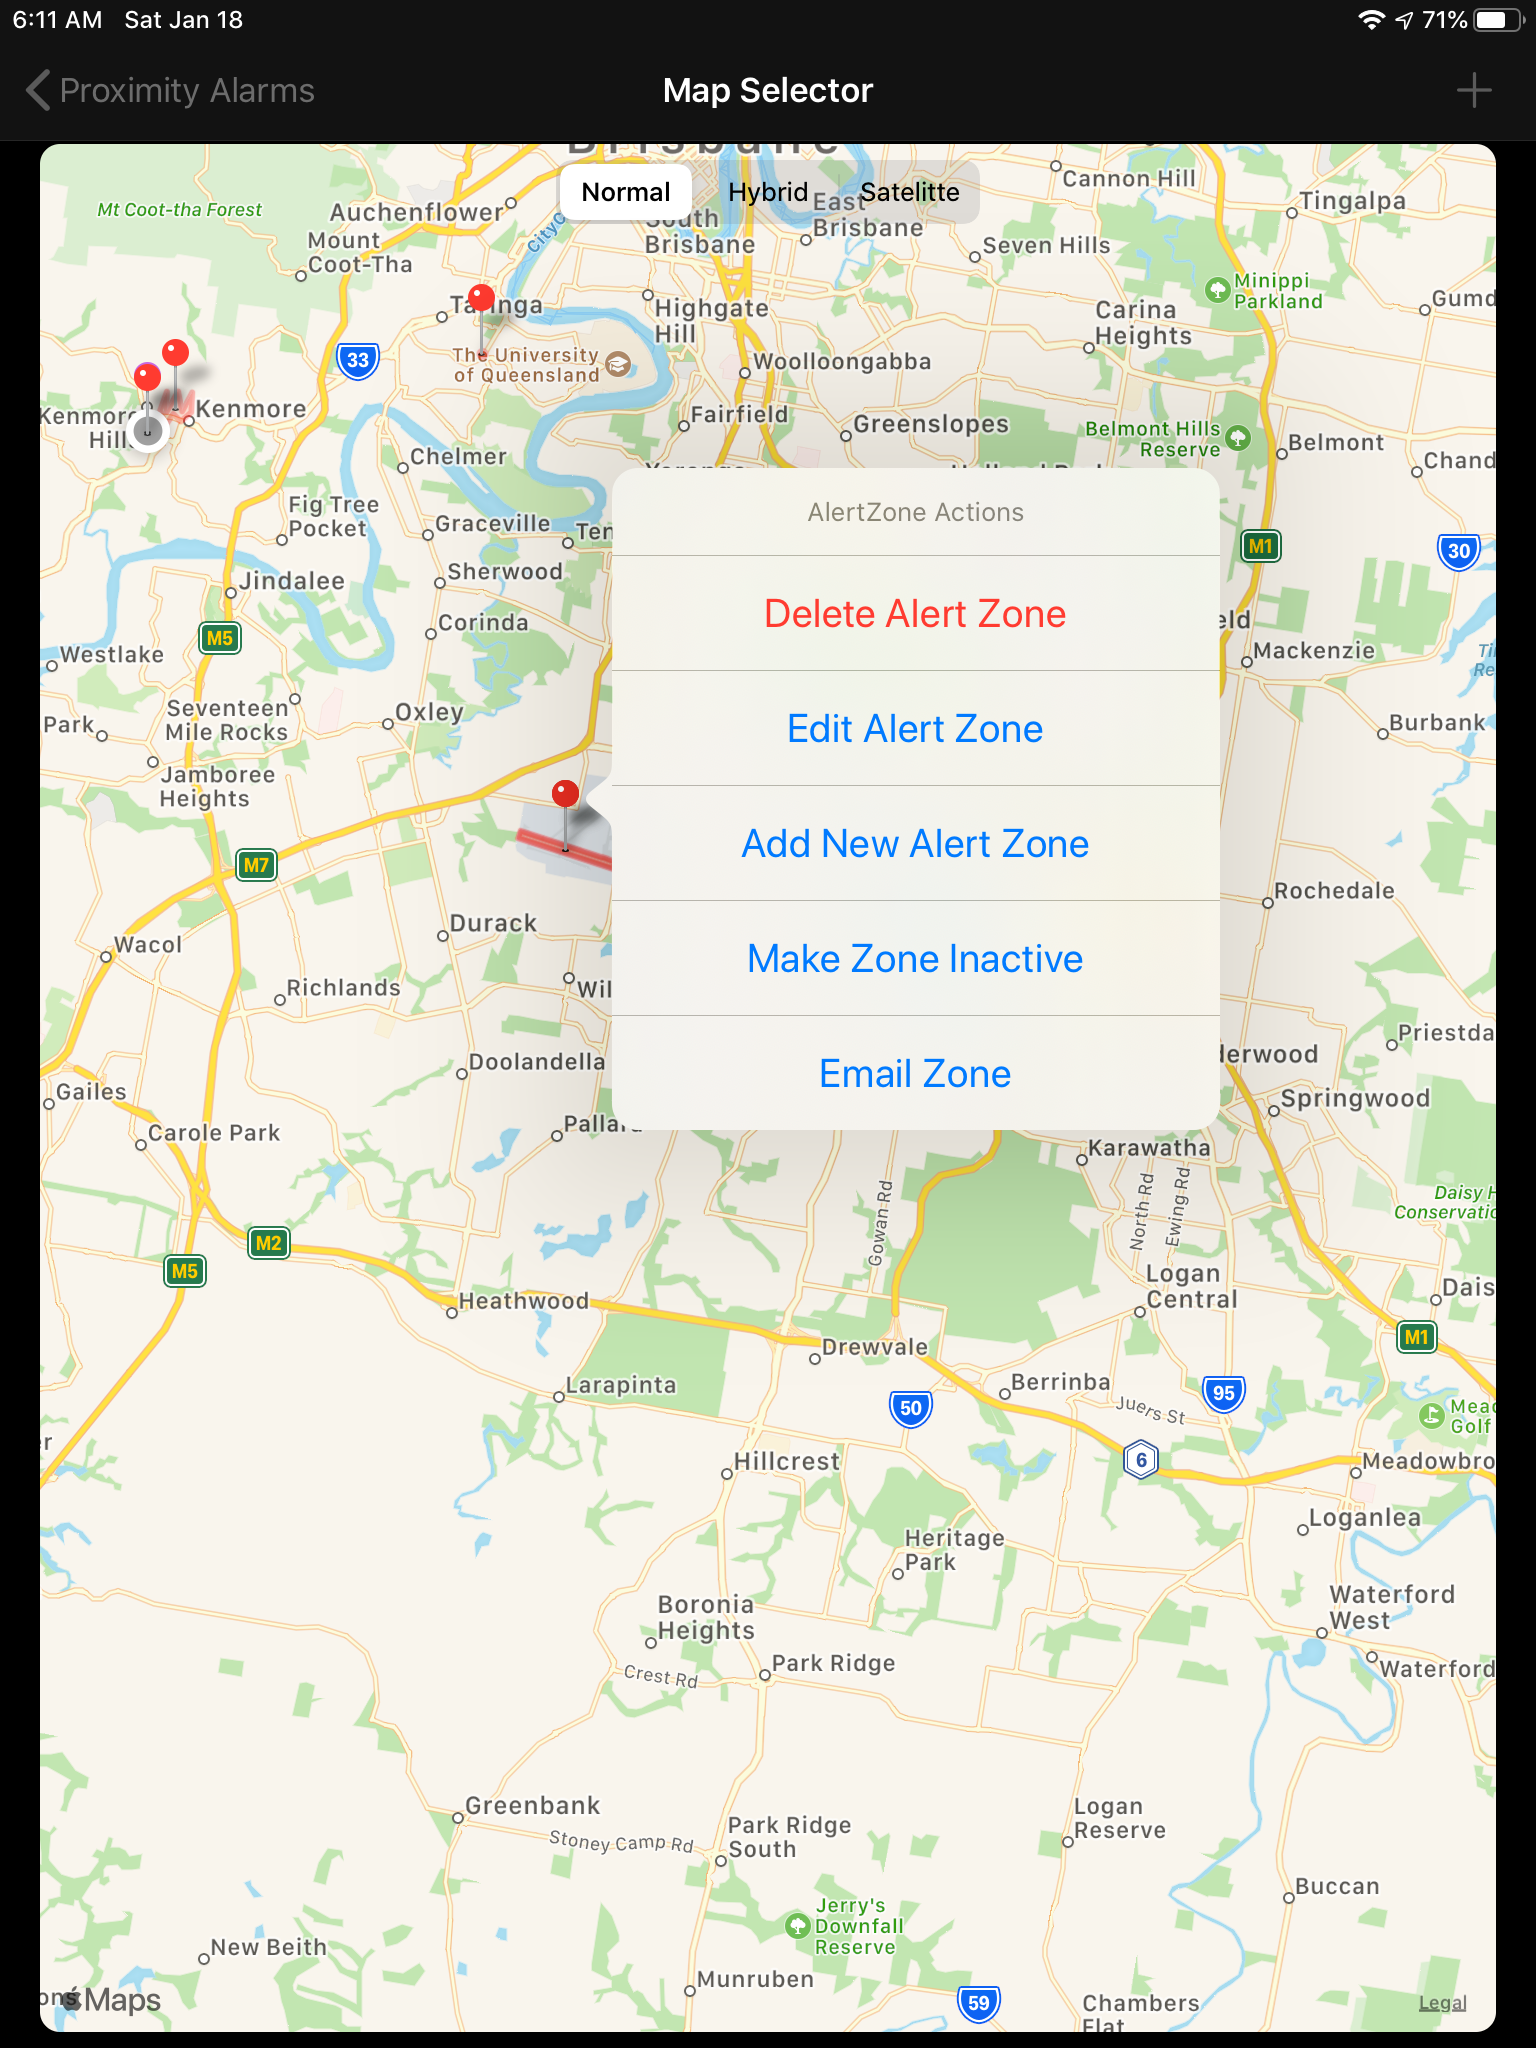
This view presents a Map, centred on the your location and with a default range set in Application Settings.
If you have any Alert Zones defined within range of the Map, they will be displayed as a filled shape, with an Annotation Pin in the middle of the zone.
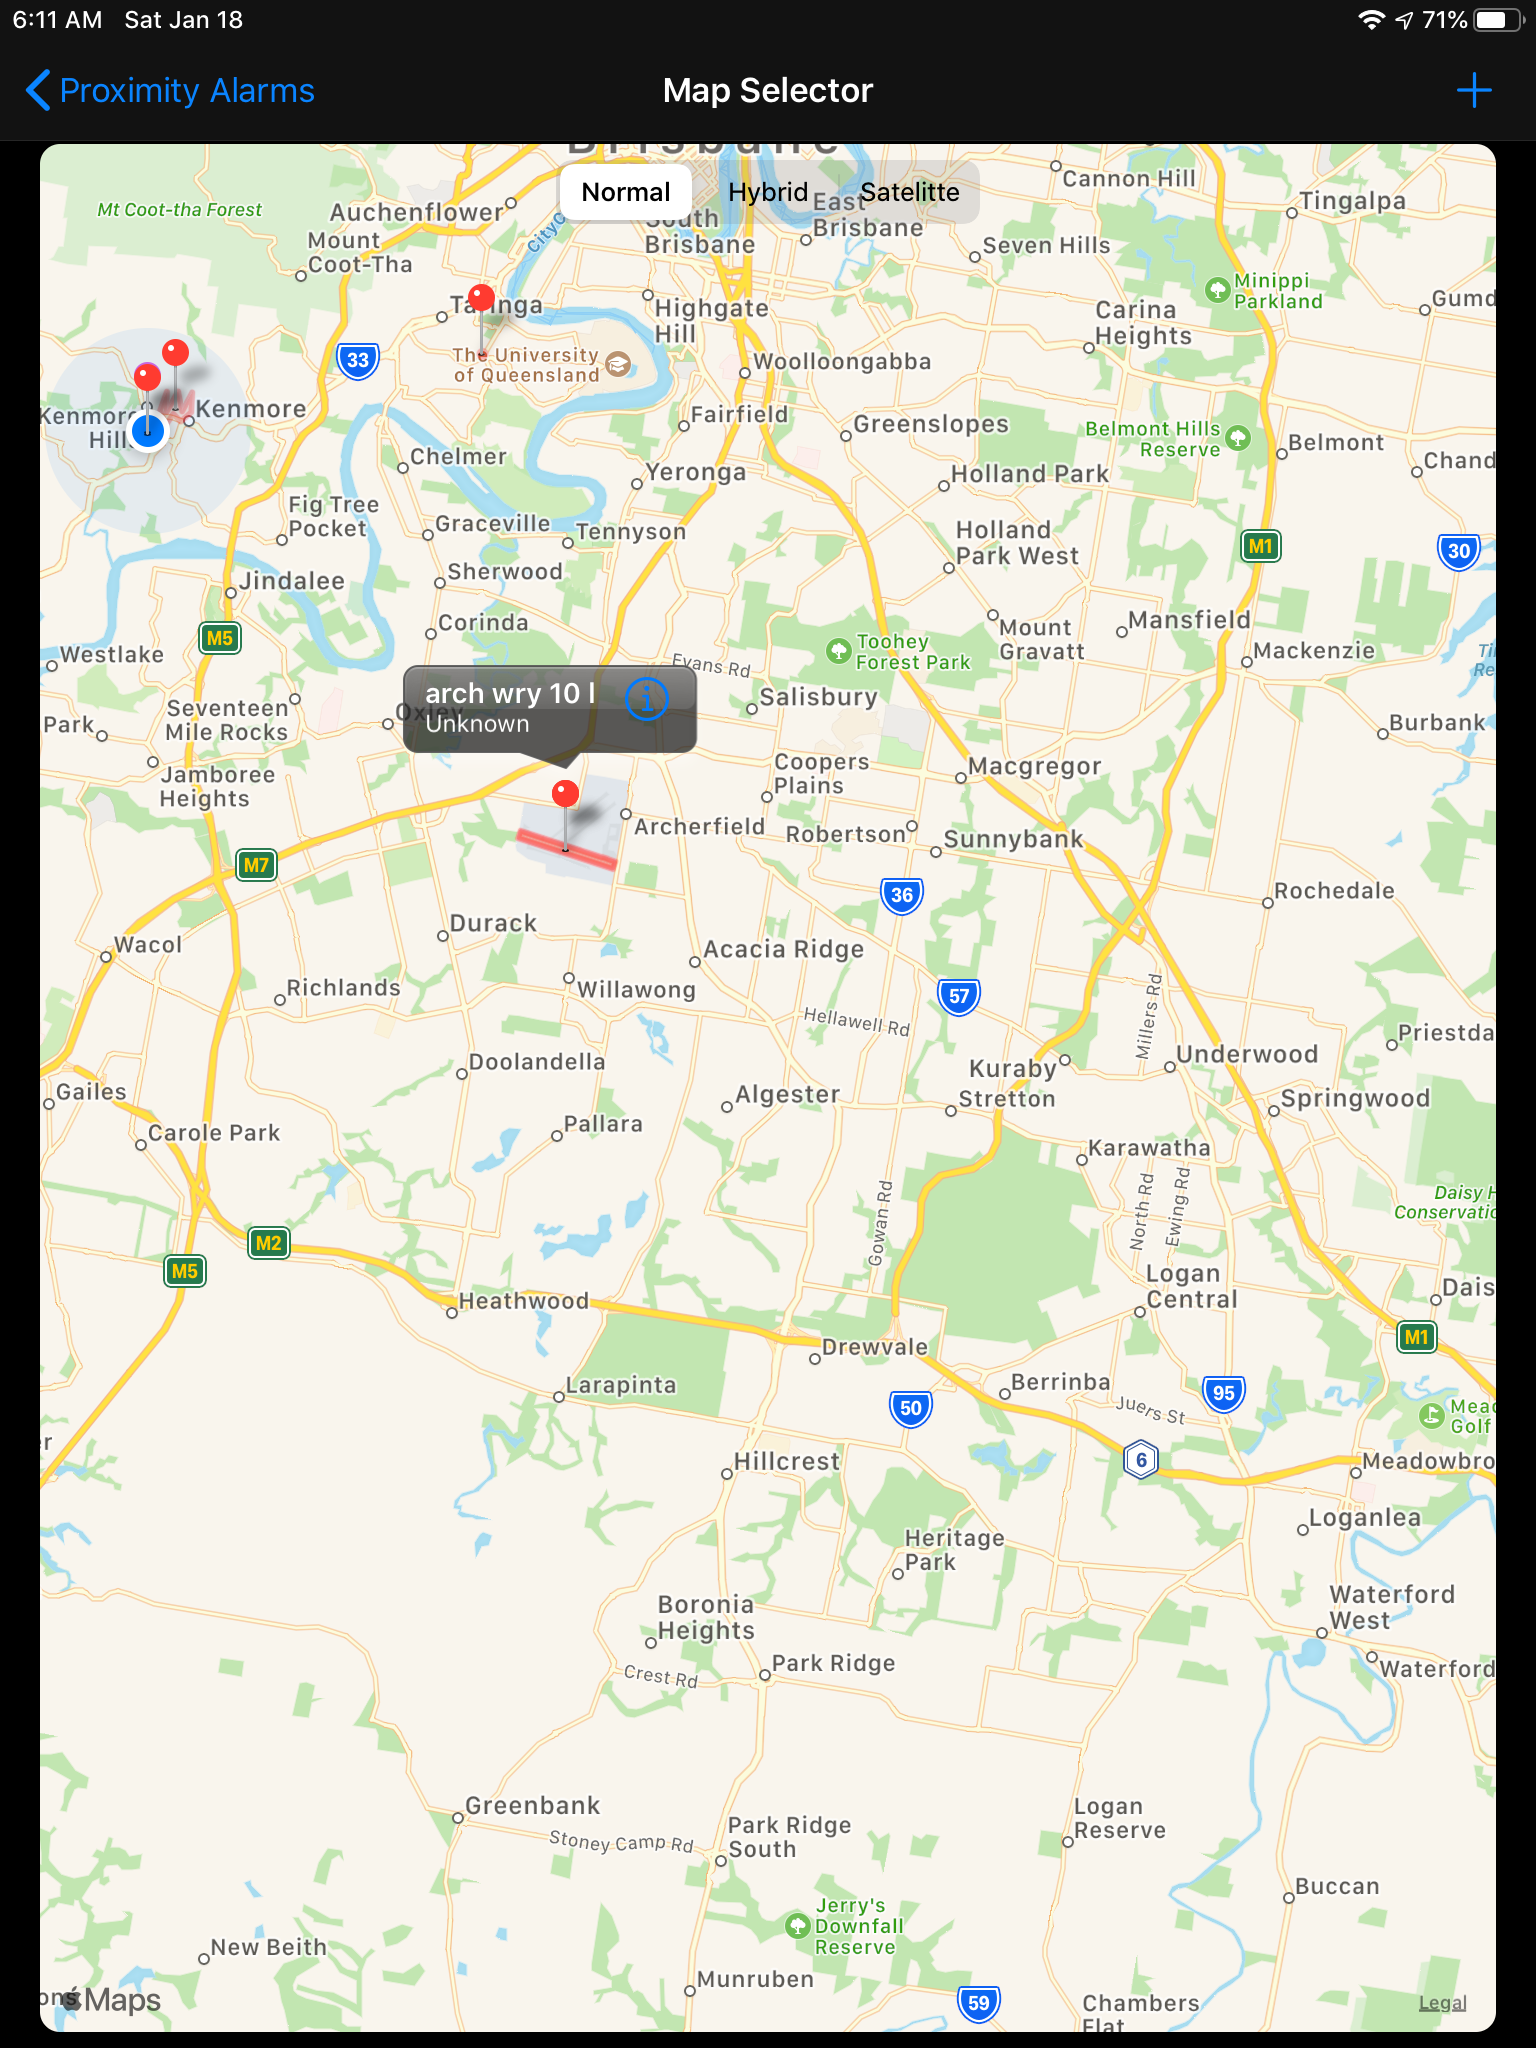
The Disclosure button will provide access to an Action sheet to allow you to :
This View presents a list of your Alert Zones, grouped with the Active ones at the top. The Alert Zones are also grouped/sorted by Category and the sorted by Priority.
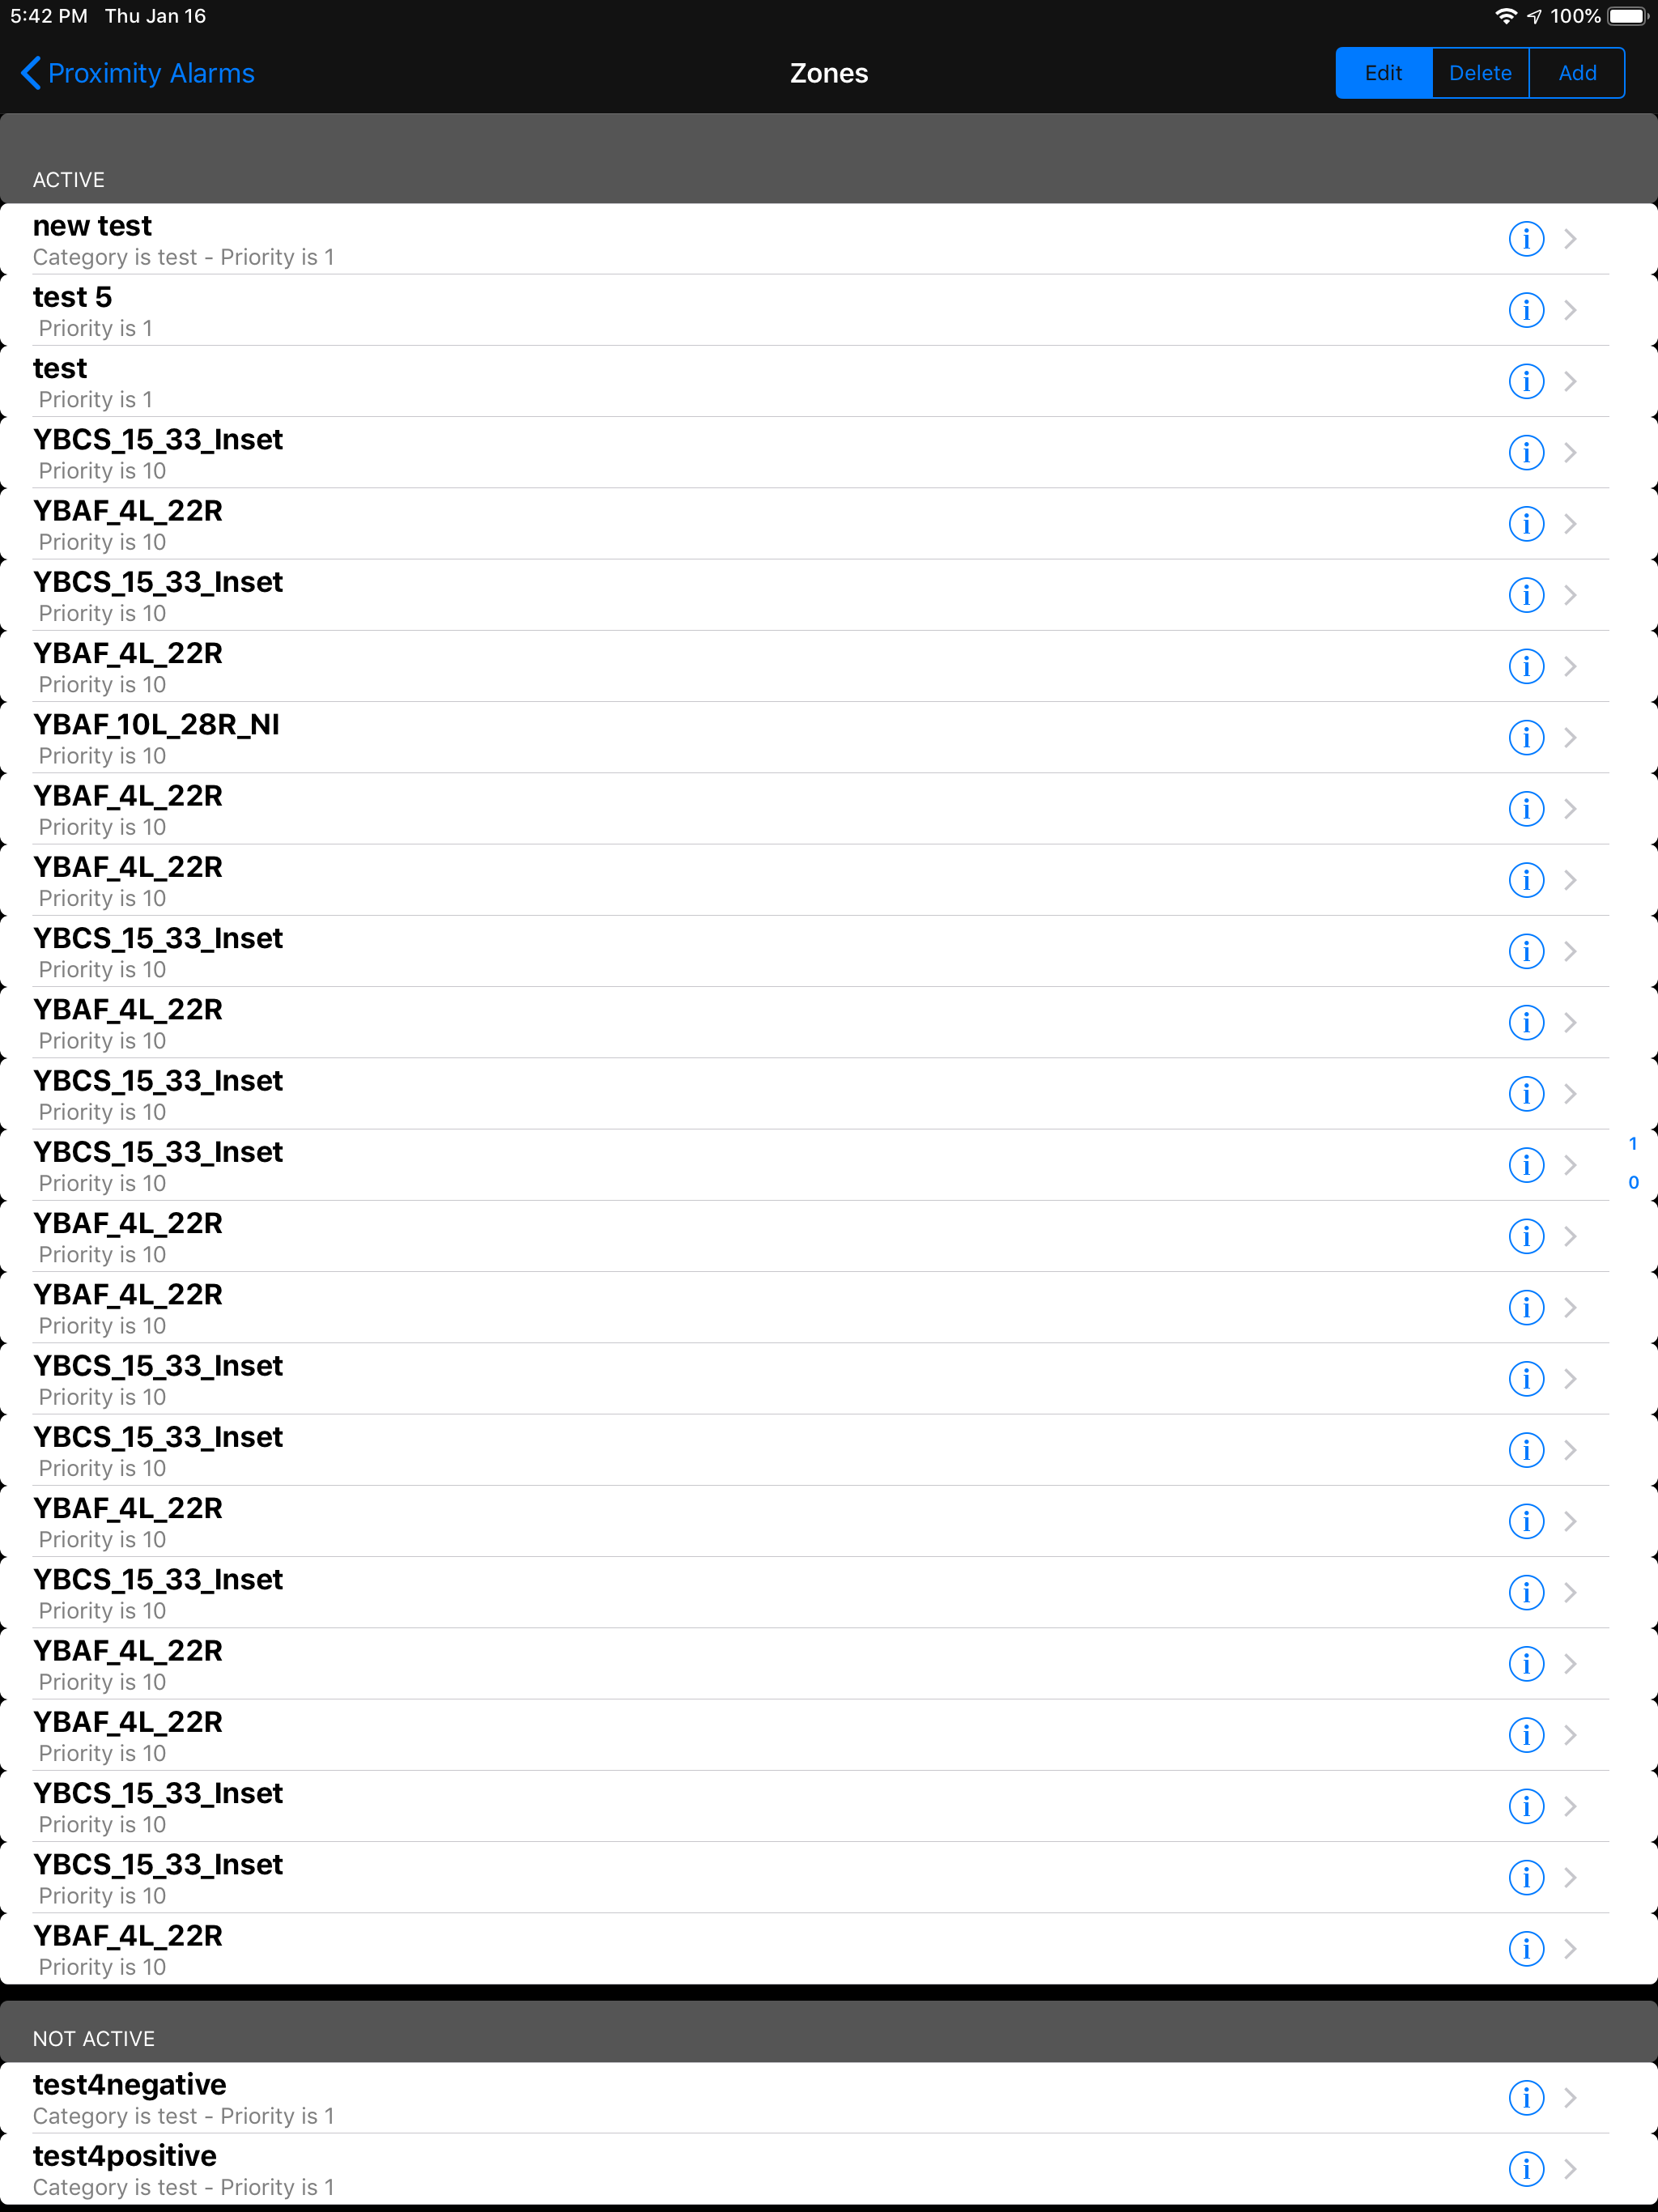
You can select an entry in the list, the effect of your selection depends on the mode of interaction, which is described below.
There is a segmented control which selects the mode of interaction with the list of Alert Zones.
The default mode is “Select”.
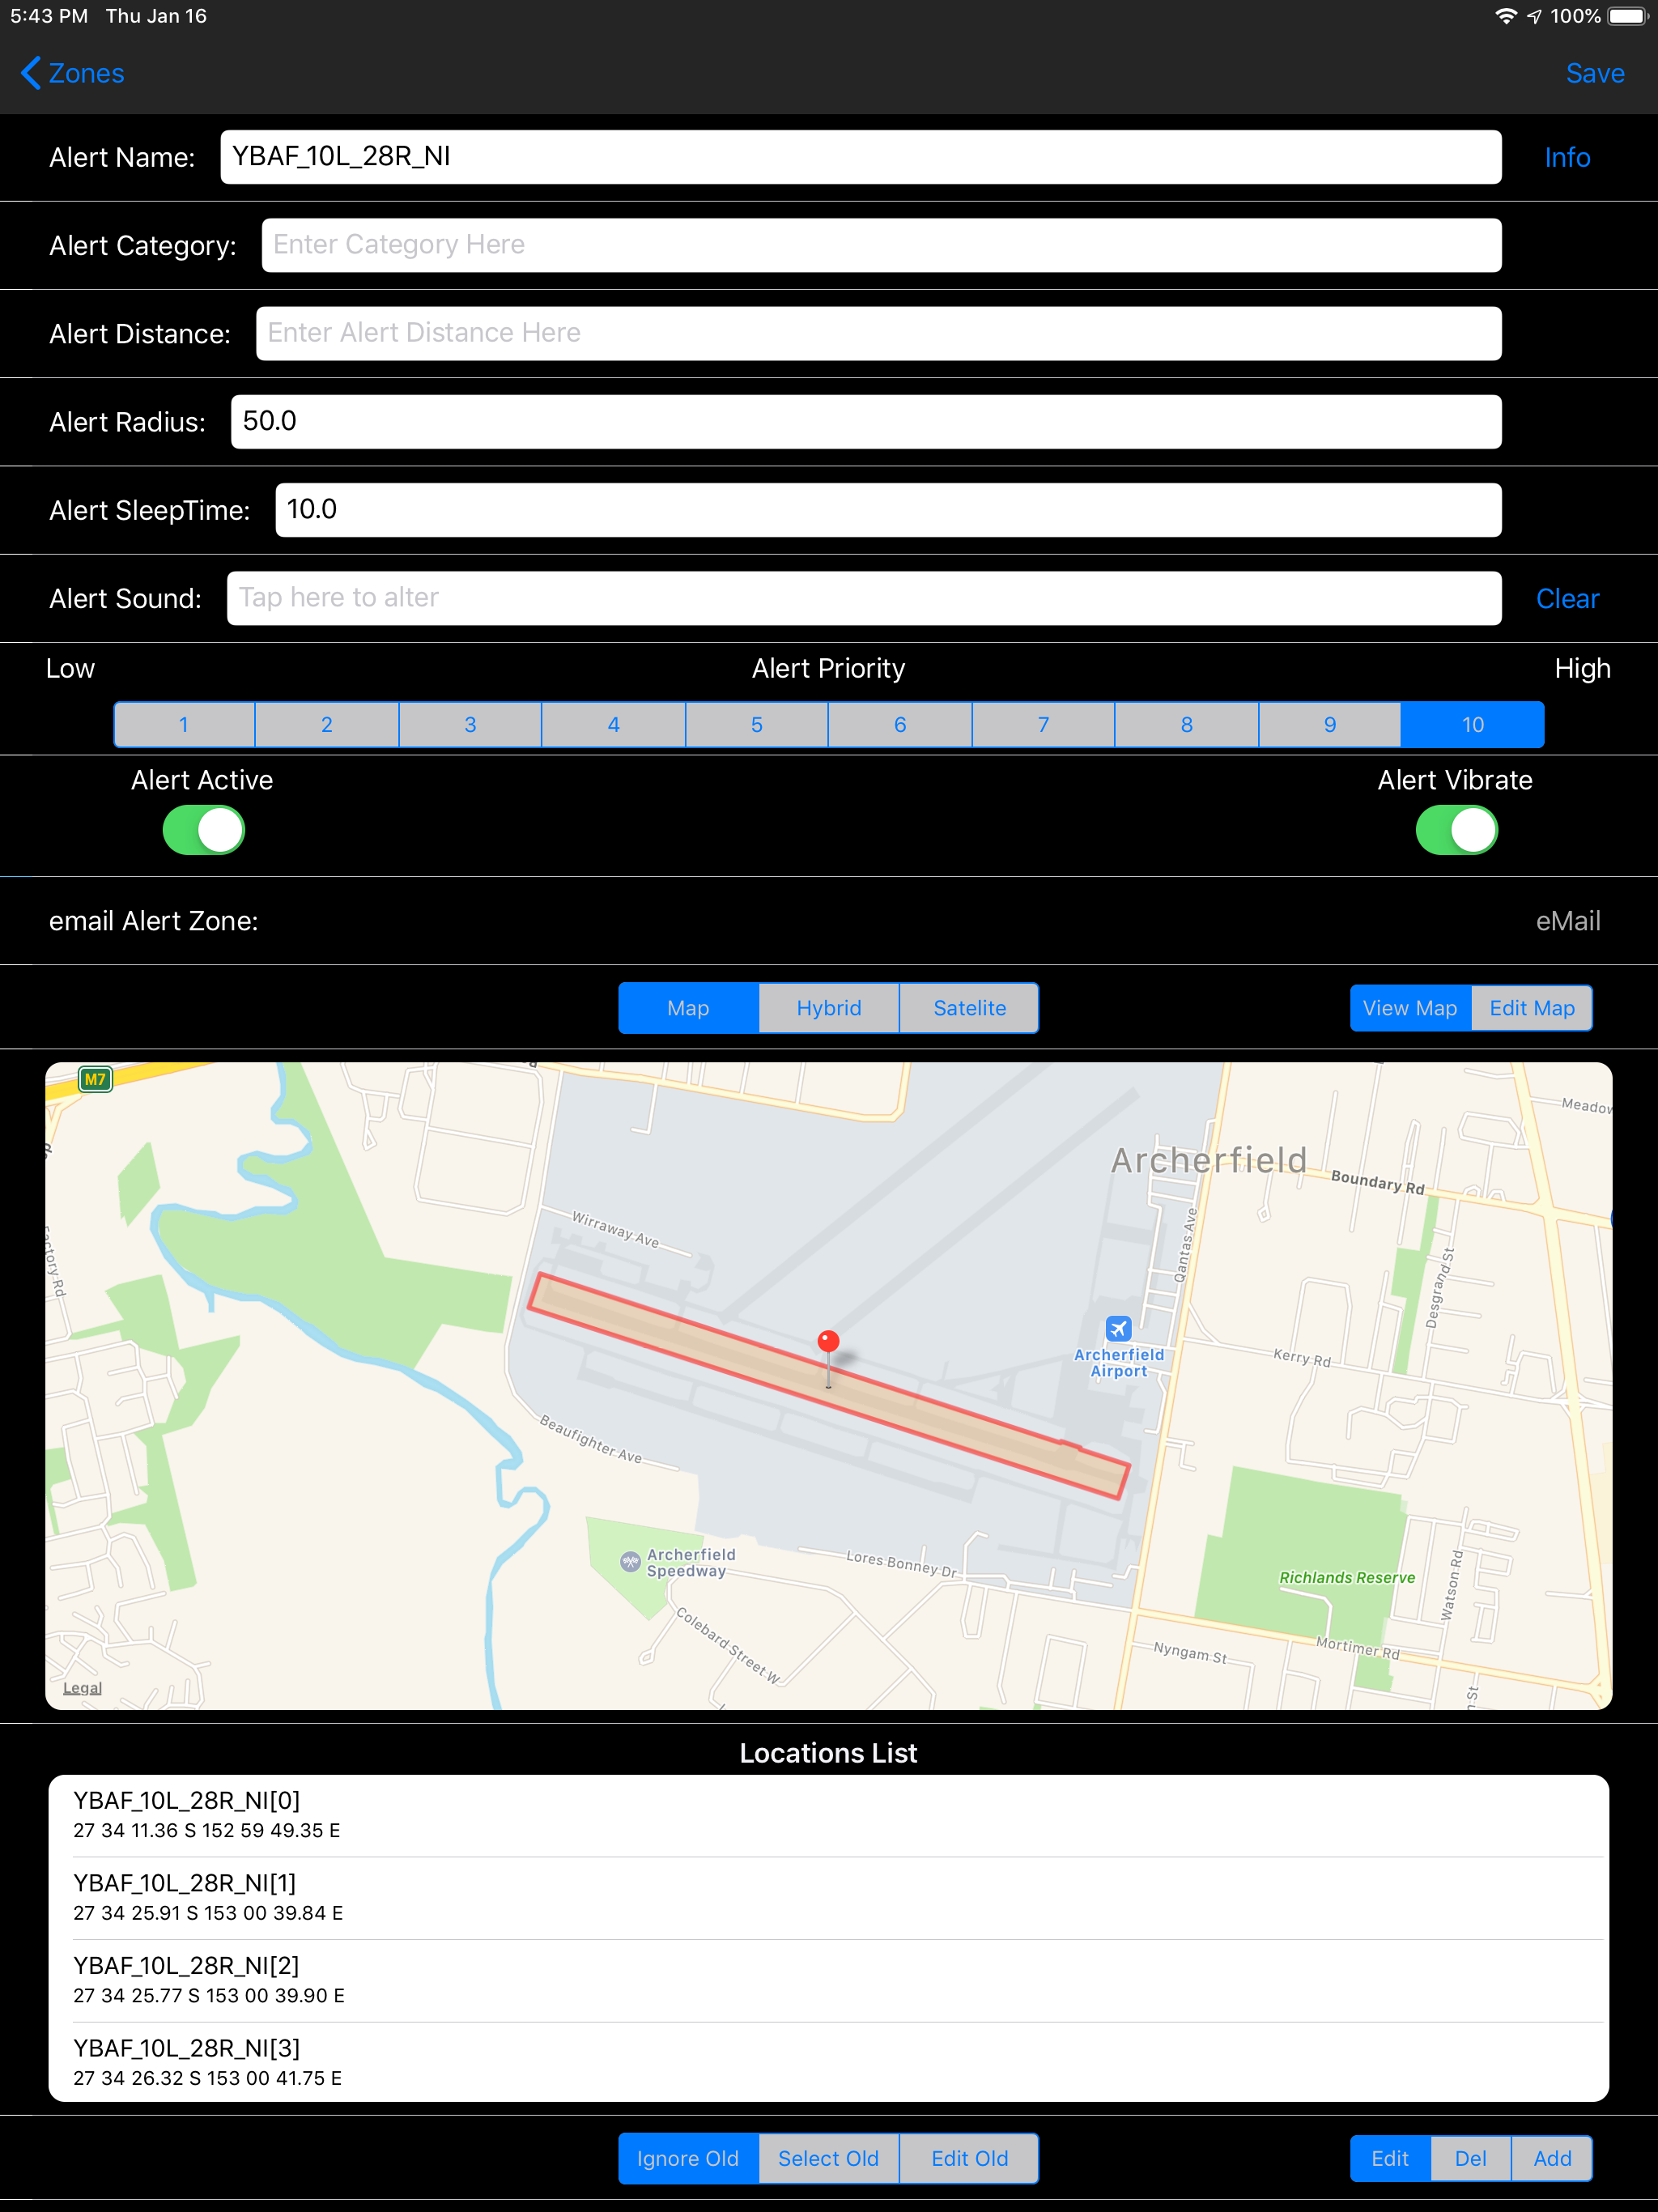
This view allows you to edit the details of your alert zone.
Note: This is table based view which scrolls.
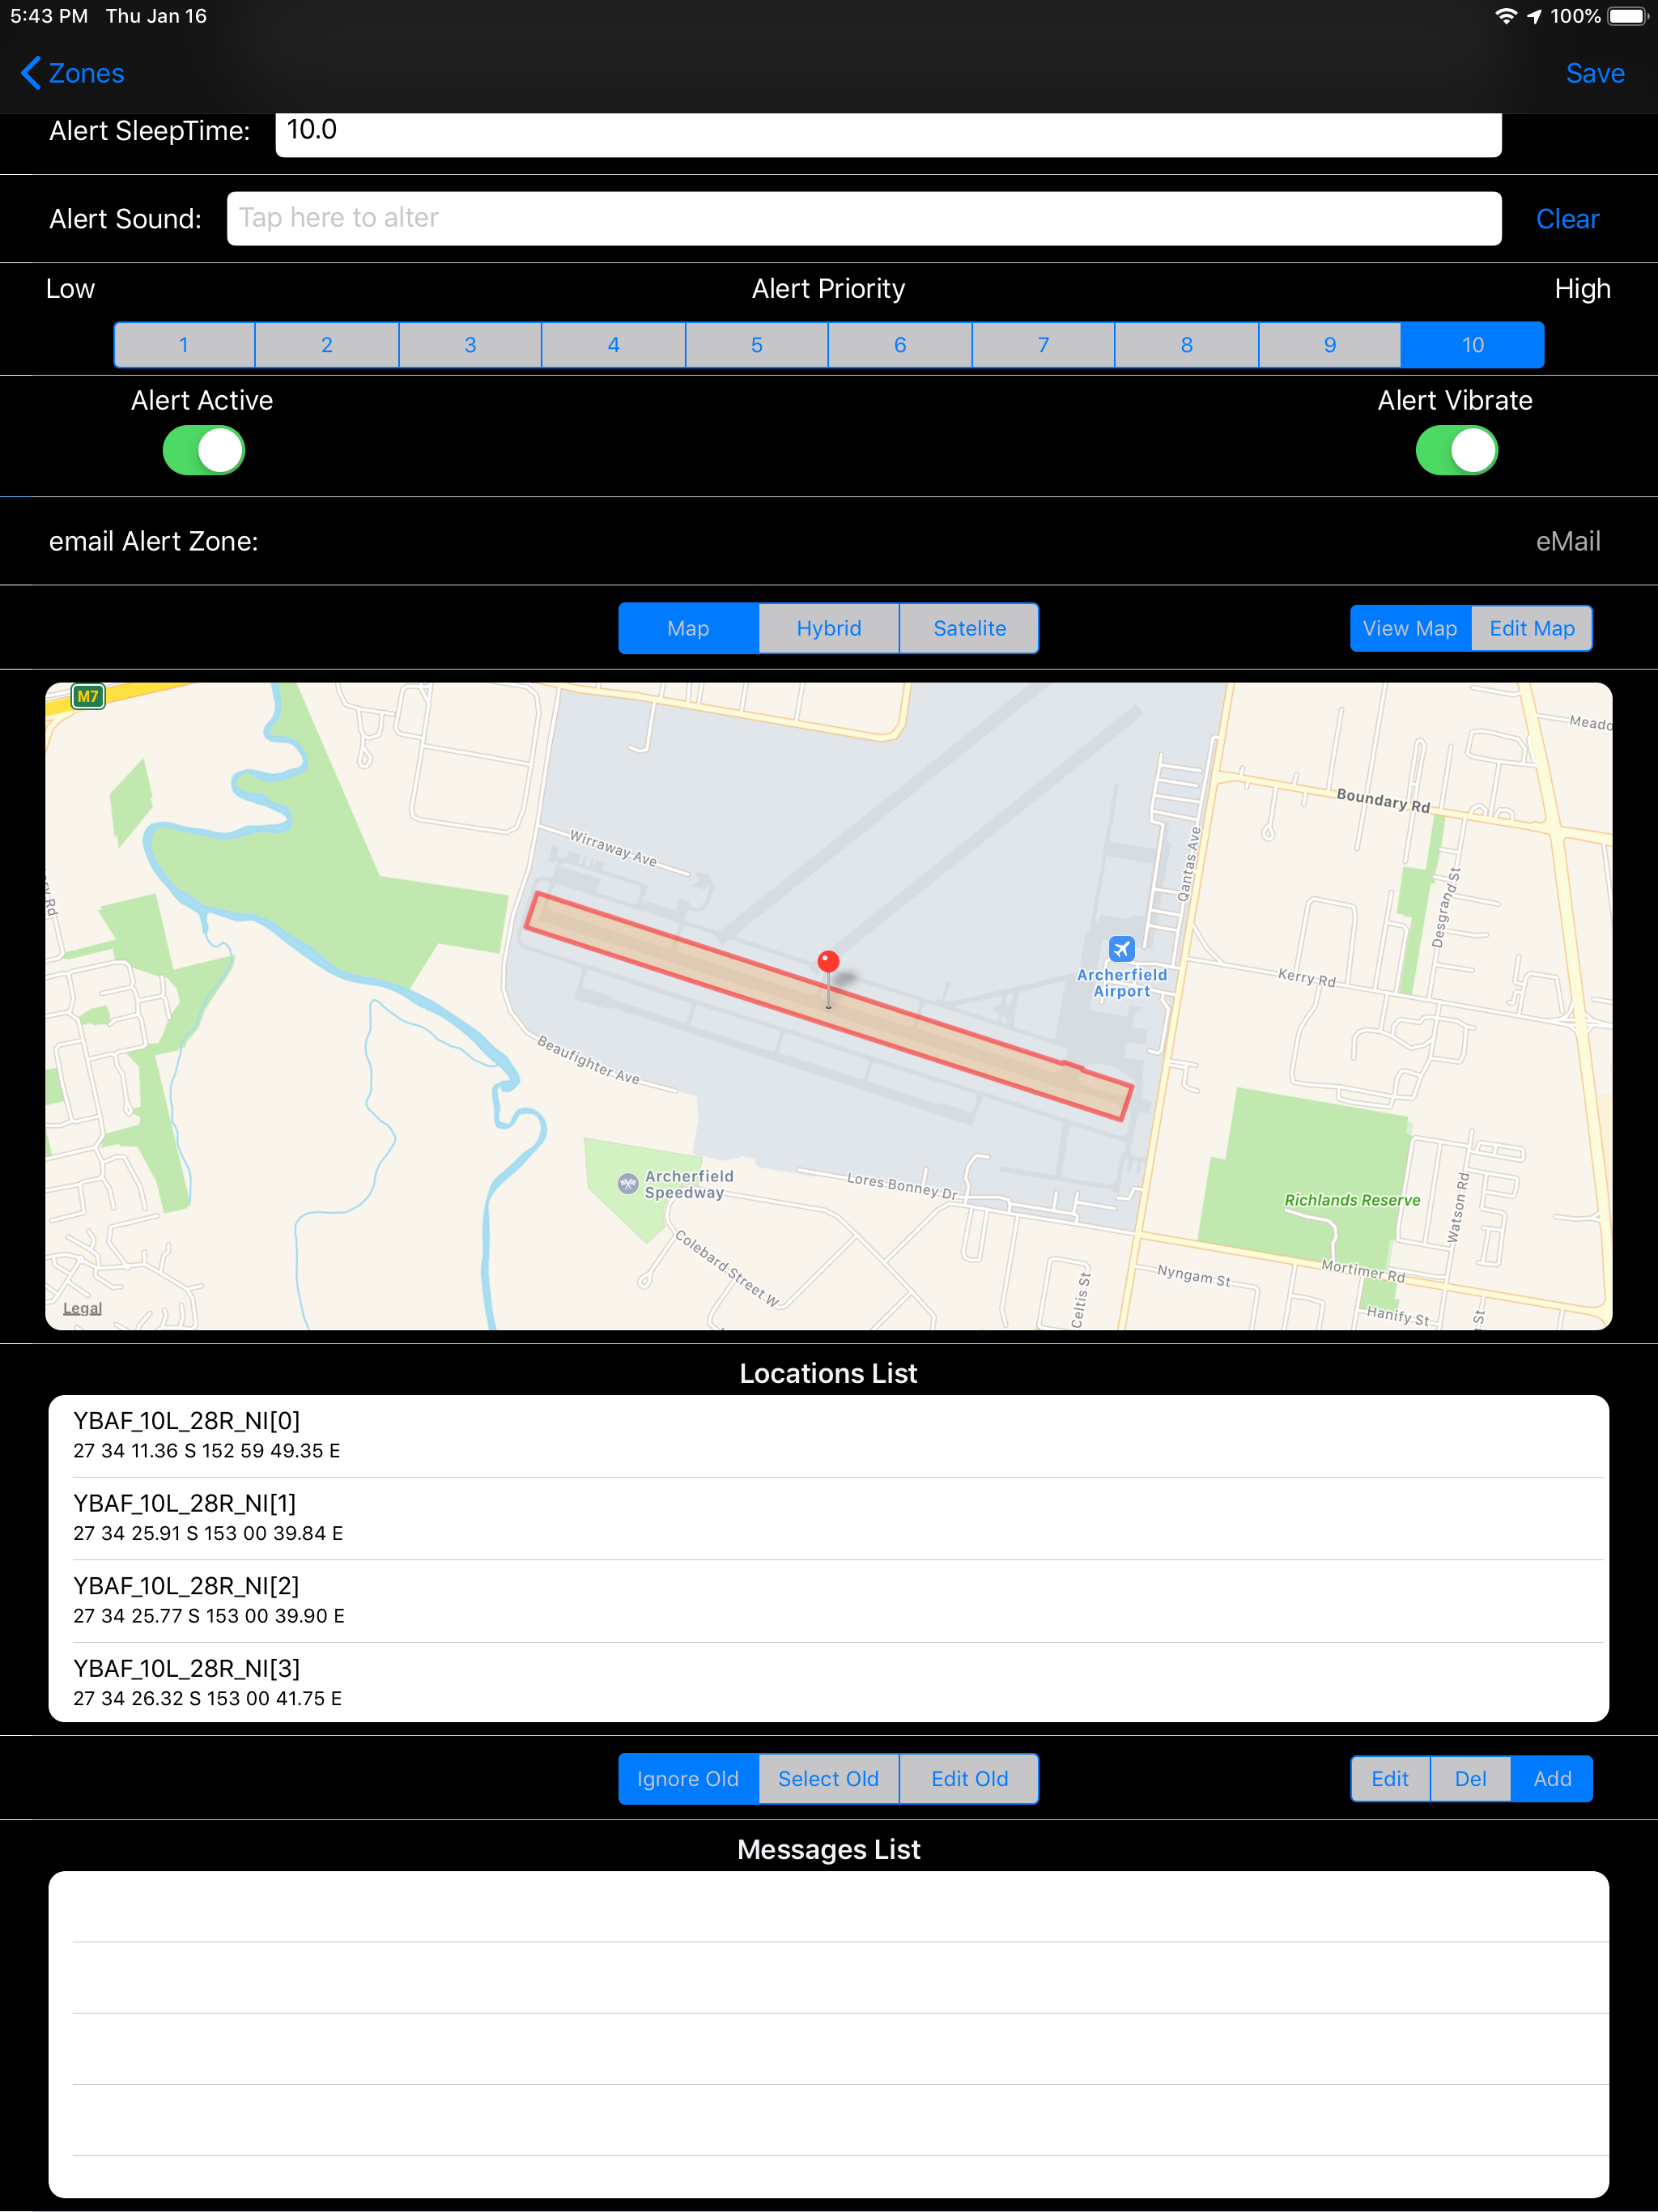

At the bottom of the Editor is a list of messages, selecting a message will lt you edit that message.
Above the Message List are two selectors.
The Right Hand Selector is [Edit|Del|Add], this directly manipulates the list, allowing to manage messages associated with this alert zone.
If there are no messages, 'Add' with open the Message Editor, otherwise 'Add' will add a green plus to each row, click on + to open message editor.
'Del' will add a red minus to each row, select the minus will display a Delete Button, the Delete Button will display the selected Message with a trash can rather than a save button, selecting the trash can will delete the message.
'Edit' just lets you select the Message for editing
The Left Hand Selector is [Ignore Old|Select Old|Edit Old] this gives you access to message you have added to other alert zones.
'Select Old' takes you to a list of all your message, you can select one to add to the current alert zone.
'Edit Old' takes you to a list of all your messages, you can edit them and well as selecting on.
You may associate multiple messages with an Alert Zone, the App will merge those messages into a single message and propose to send it to all the addressee.
The app can only propose to send a message, you have to select to send it.
The [View Map|Edit Map] toggles between a View mode which shows an annotation on the selected Alert Zone, and Edit mode which shows annotations on each location associated with the Alert Zone and allow additional locations to be created with a long press on the map.
You can swipe to scroll.
You can pinch to zoom.
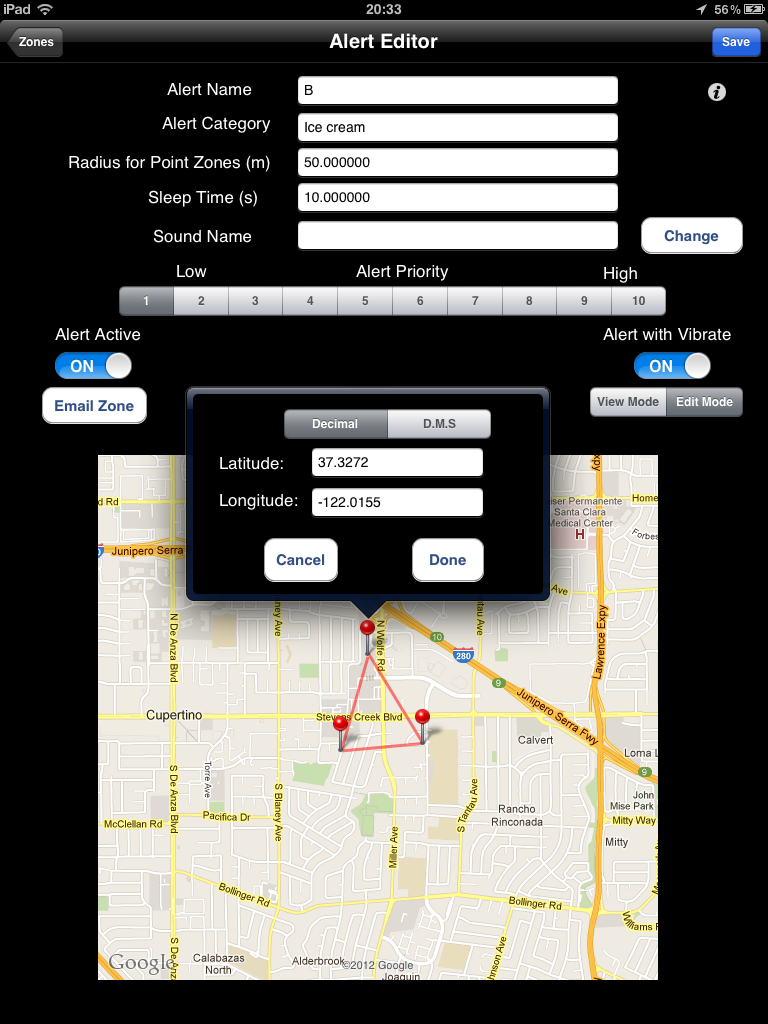
You can tap and hold to create a new Point in the Alert Zone, be careful if you hold for more than 2 seconds you will create duplicate points, you can easily delete one though.
You can select the Annotation PIN.
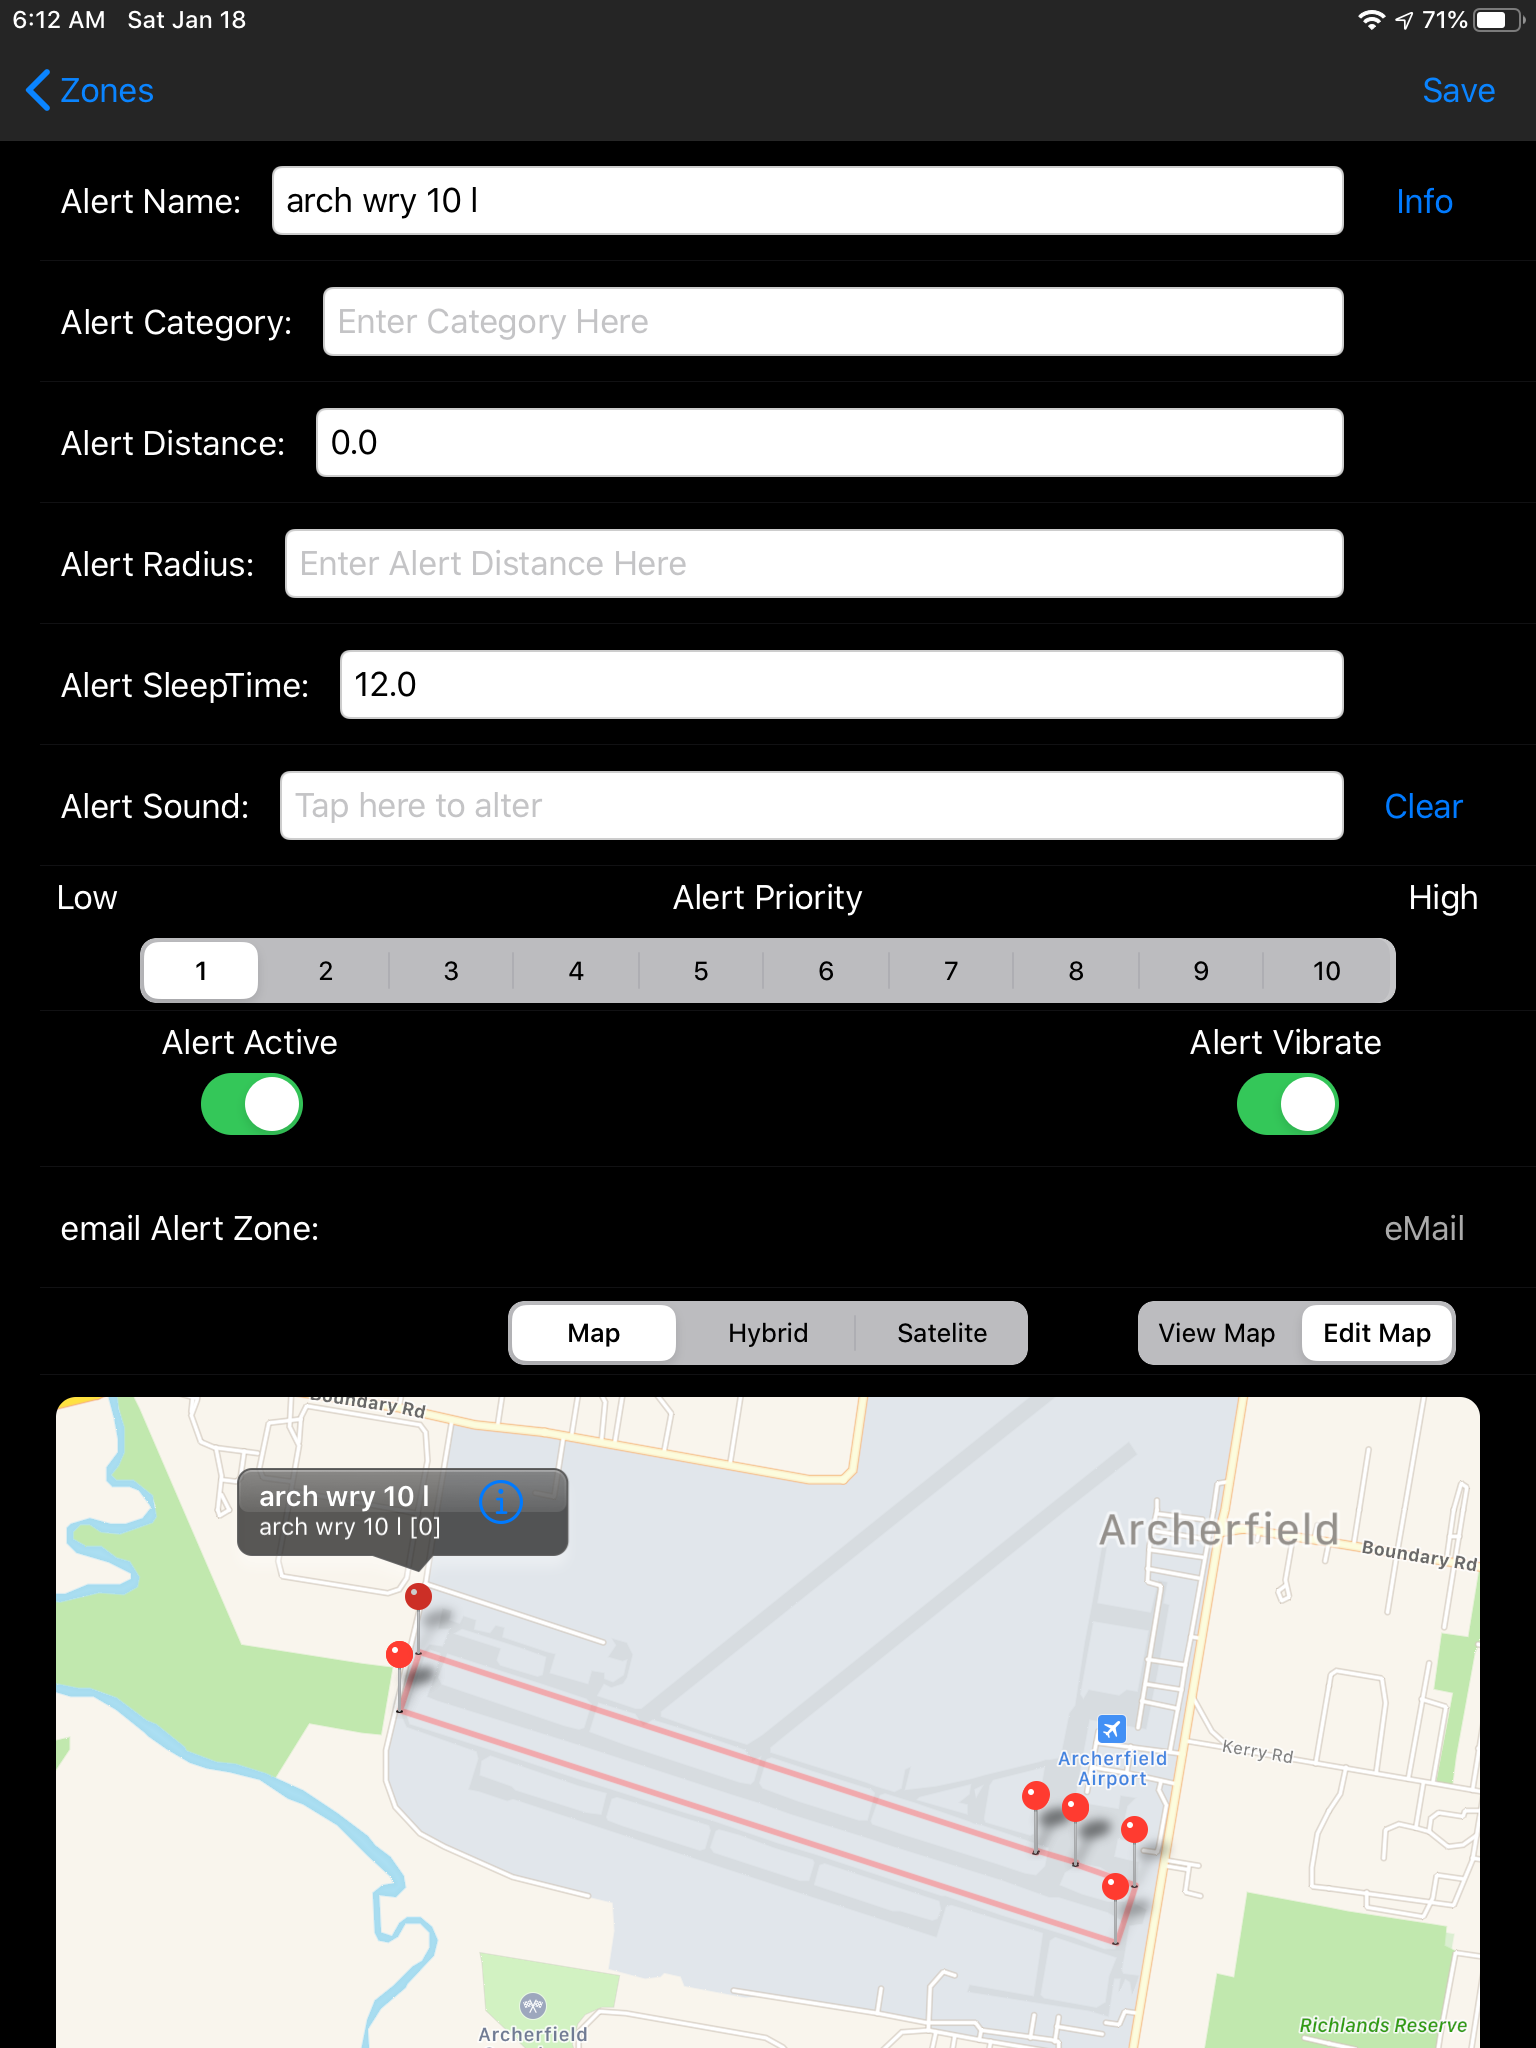
This will cause an information tag to appear giving the Alert Zone Name and an Index Number for the Point and showing a Disclosure button.
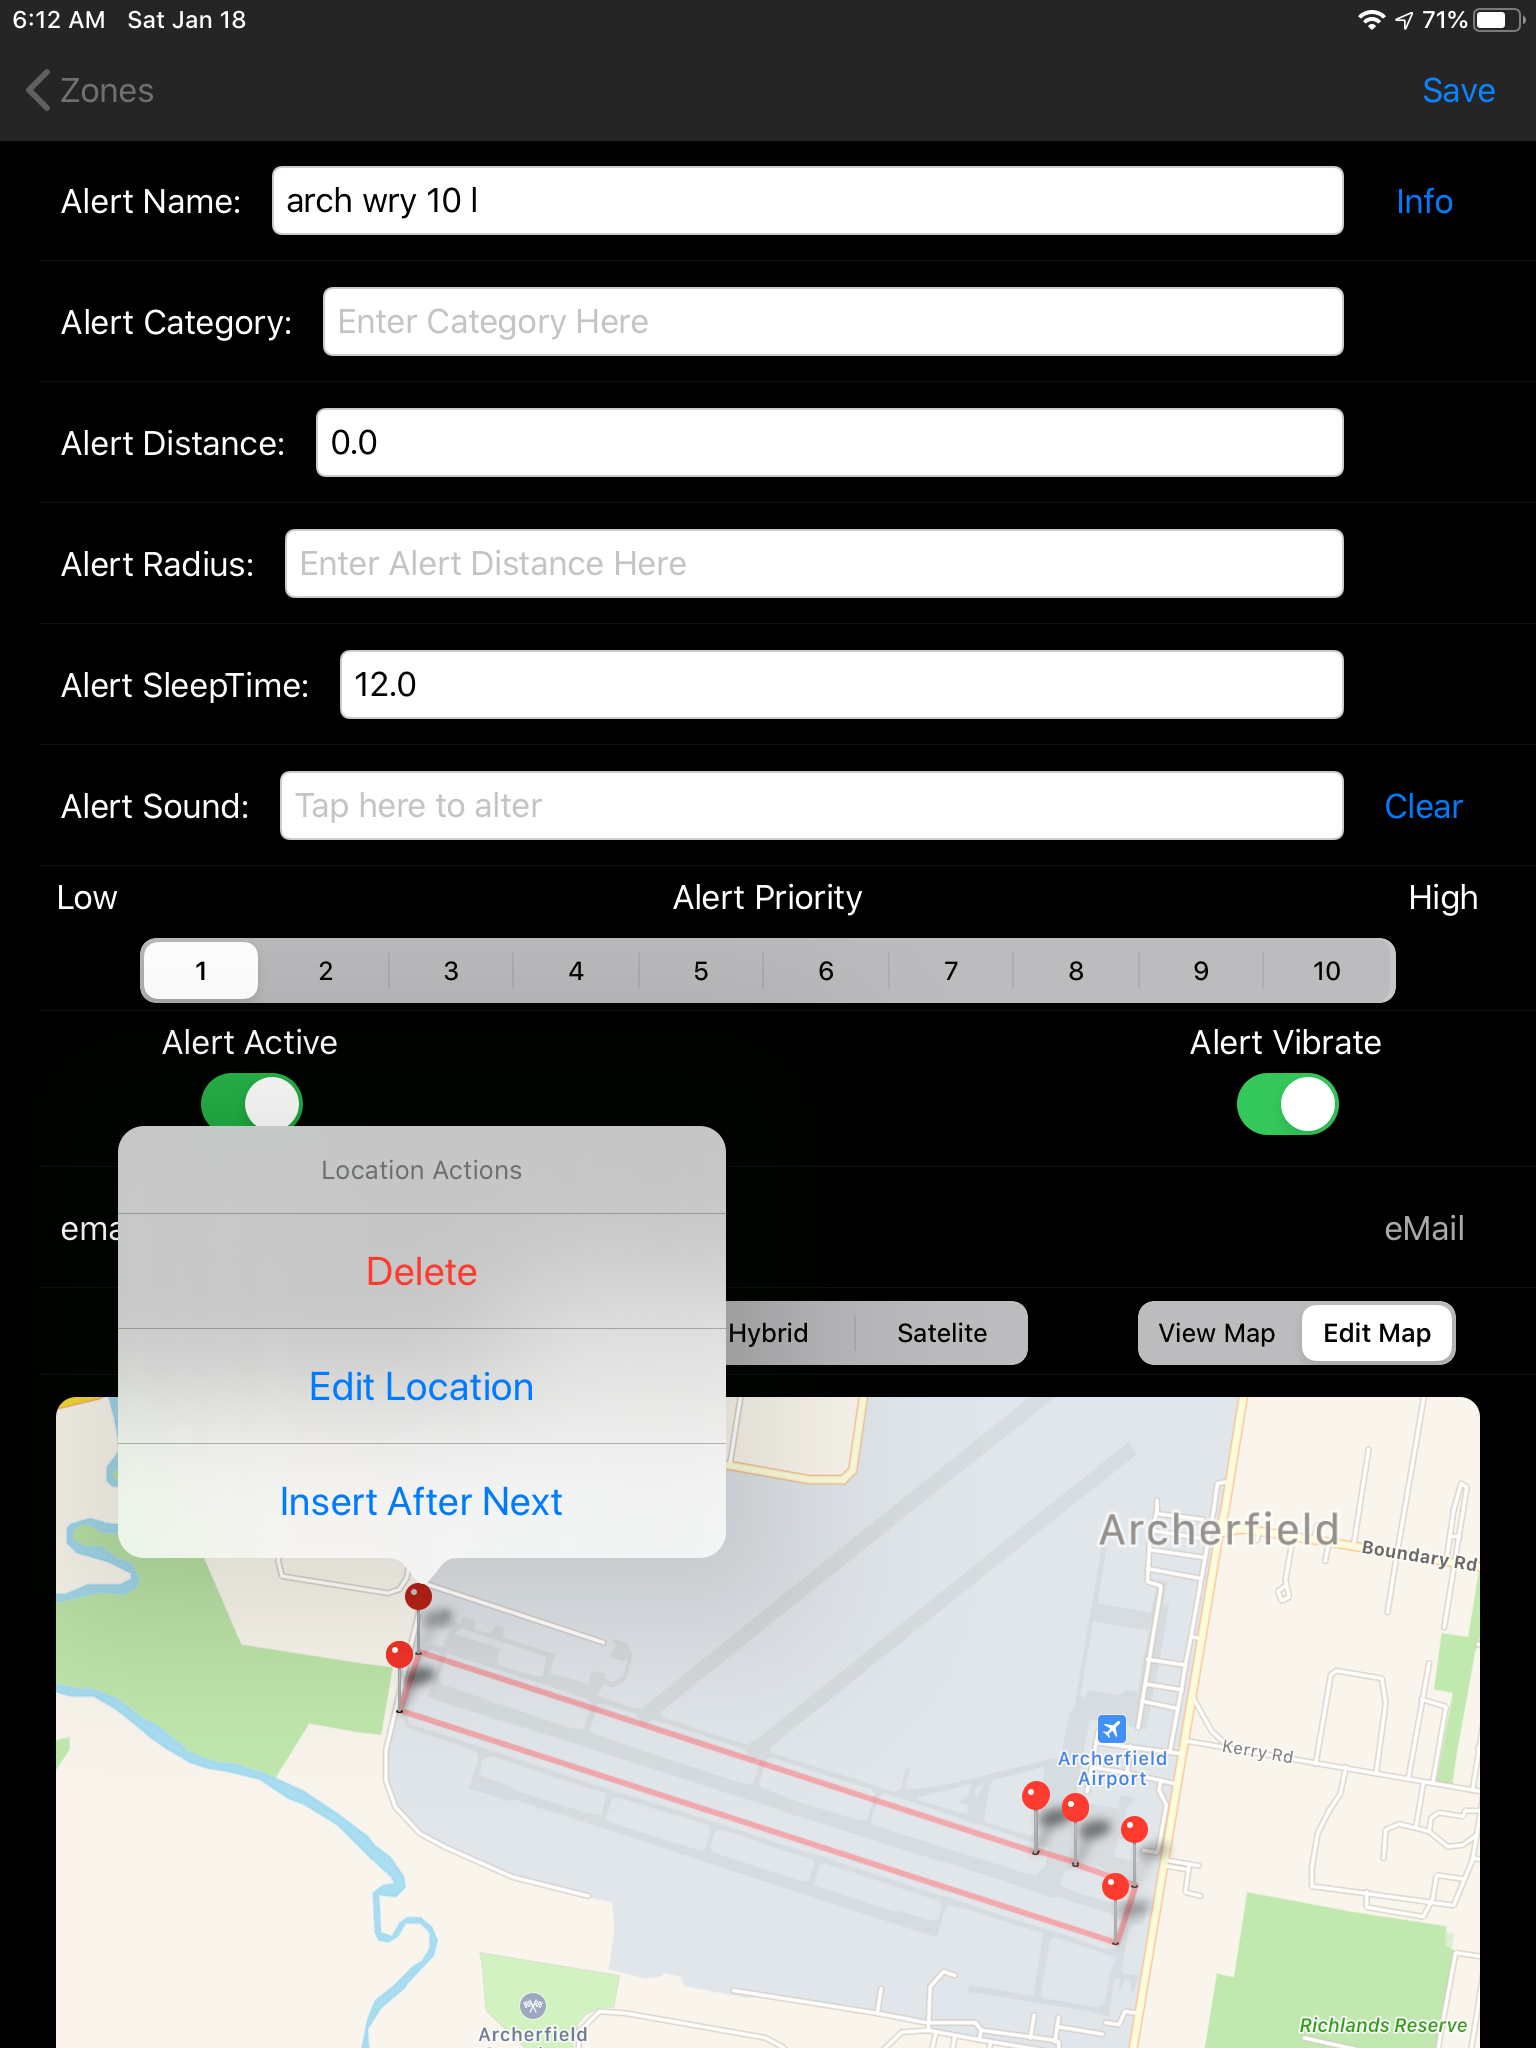
The Disclosure button will provide access to an Action sheet to allow you to :
In addition you may drag the selected Pin to a new location and the PIN will lift and the Alert Zone Point will move to where you drop the PIN.
The [Save] button will save your edits.
The alert zone editor can be accessed from either the Map Selector View or the List Selector View in either case the “back” button in the Navigation bar will return from whence you came.
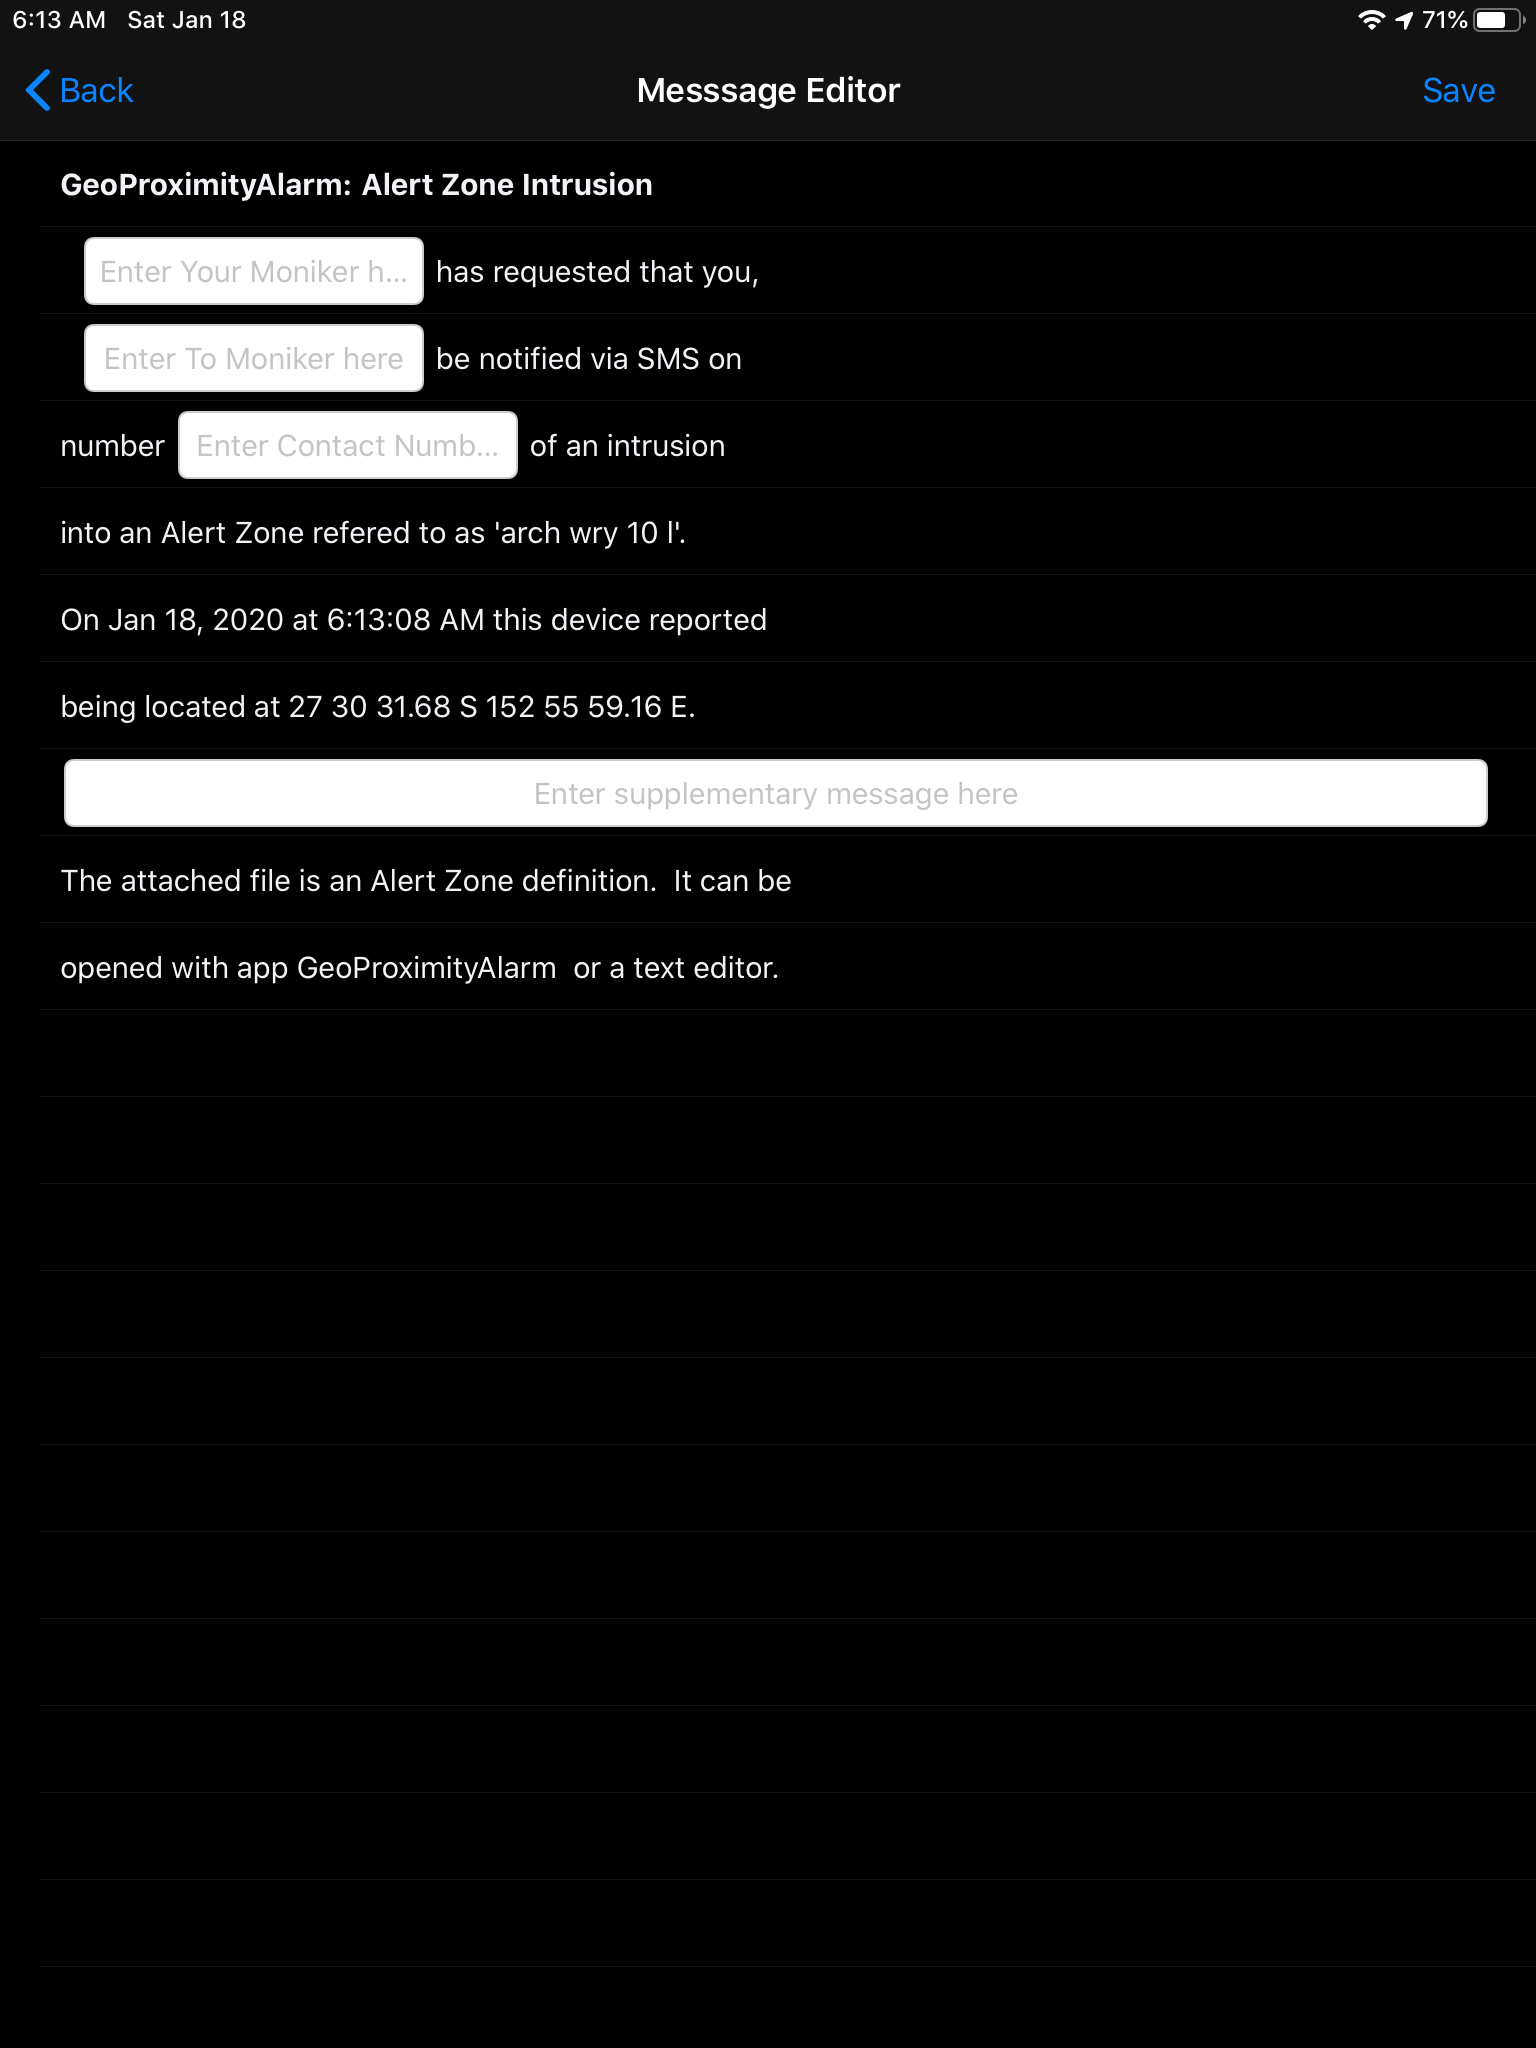
This screen creates a mock SMS message and provides four text fields to enter information.
Your Moniker - How you was to identified by the person you are sending the message.
To Moniker - An identifier for the person you are sending the message
Contact Number - The phone number to end the message too.
Supplementary Message - A line of text you want to add to the message.
This view allows sounds to be played and selected; if you play a sound you will be given an opportunity
to set a description for the sound, if you say NO it wont ask you again this time ! The Description will appear in the
list but otherwise has no meaning.
The Mode Selector Segmented Control, this controls the effect of selecting a sound in the list.
The Back button “Alert Zone Editor” will return you to that view.
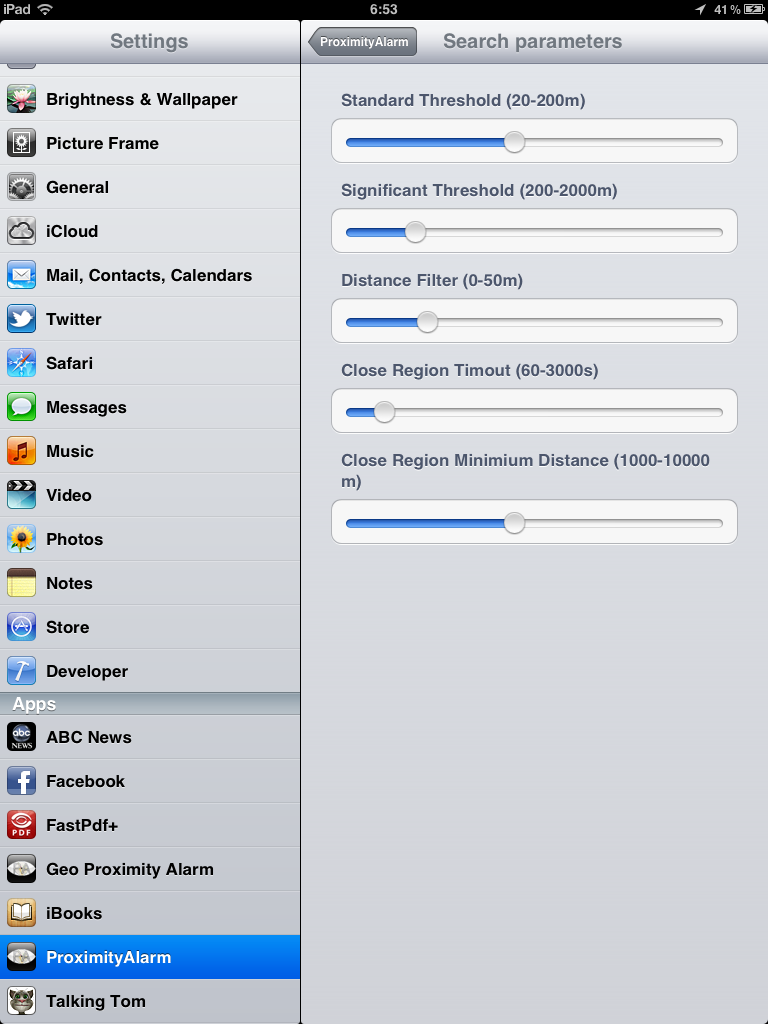
These may seem complex but the idea is to preserve your devices battery life as much as possible.
When you are within the Standard Threshold (Setting attribute) distance of a Zone, then it use the Standard Location service which notifies the application when you move more the Distance Filter (Setting Attribute) distance.
When you are not within the Standard Threshold but are within the Significant Threshold (Setting Attribute) distance, then it use the Significant Location Service which notifies the application when you move a significant distance.
Otherwise we use the Region Location Service. The Region Location Service defines Circular Regions are the application is notified if you cross the region boundary. The application creates a circular region around you Alert Zone which is at least the Significant Threshold Distance larger than necessary to enclose your Alert Zone, but typically is 1.5 times larger than necessary.
It creates a Region for each of the Alert Zones which it considers to be close to your current location. If you are already inside a Region, then if it will give up on the Region Service and go back to the Significant Location Service. A close Alert Zone is any Alert Zone within the Minimium Close Distance(Setting attribute) or twice the distance to the closest region
Once a alarm is triggered, the Alert Sound and Vibration will repeat at the Alarm Cycle Time (Setting Attribute), unless you choose to SLEEP from the Alert.
Note: Notifications can be configured in Settings, if you turn off the sound in Notifications Settings, there is nothing the application can do about it.
You can send and receive AlertZones by email, you can only send a single AlertZone at a time from the application. Note: You IDevice must be configured to send and receive mail for this function to be utilised.
You can send an Alert Zone from either the Map Selector view or the Alert Editor View. Sorry not from the List Selector View there are too many options there already for a list.
You can in theory generate a CSV file offline and send it too the application, but you will need to be careful of the character encoding and sound names must match exactly and are case sensitive.
If you are wondering I specifically built this feature into the applications to allow an organisation to send predefined zones to their employees.
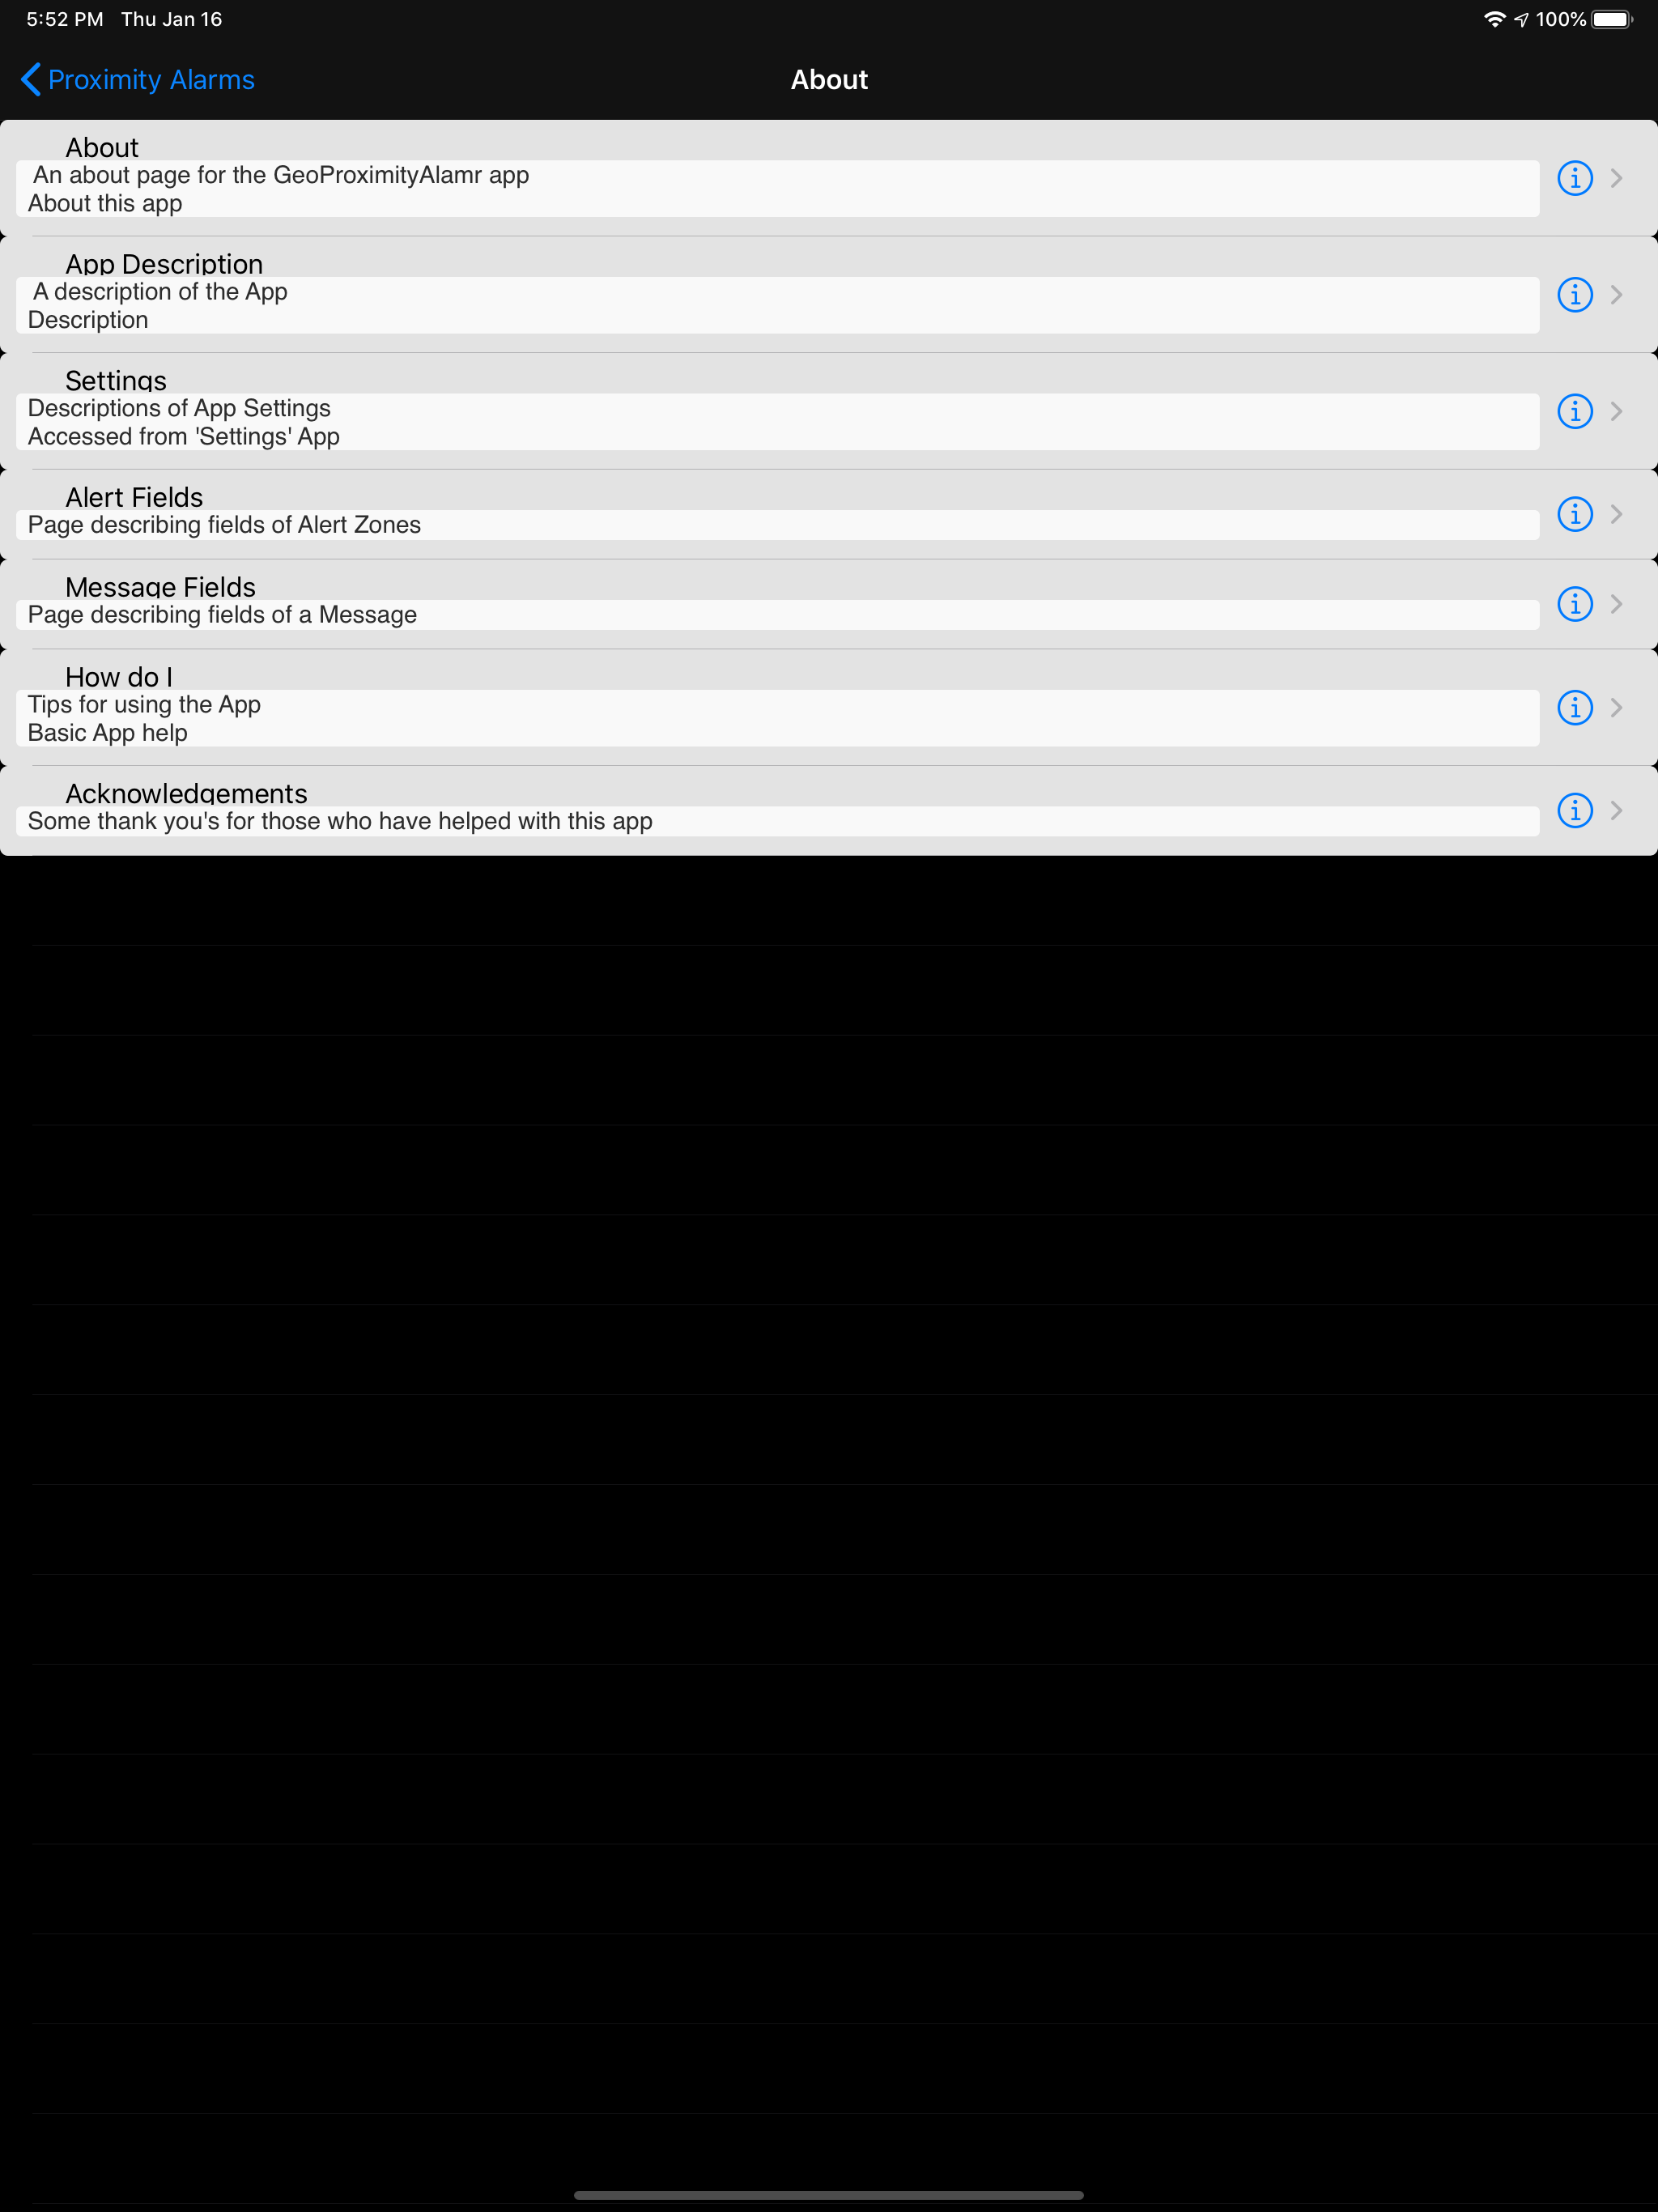
The Info Button on the main screen will lead to an about screen which is illustrated below, touch the disclosure buttons to access more detailed information.
A simple CSV file with UTF8 encoding with a “pad” extension, no it is not being funny, it is an acronym, “Proximity Alarm Data”. It is actually a poor mans XML because
I could not be bothered to write a proper parser ! On that subject the CSV parser is not sophisticated, commas inside quotes are treated as field separators for example.
All except the last and first lines within an alert zone may be in any order, and may be missing.
Version 1.4 will remove the need for it to be a UTF8 encoded file.
A file may contain any number of alert zones. The Locations should be numbered in sequence, if you give the same number to two locations then the result is random.
The only field of note is the alertZoneInset row, if you specific a positive inset then the alertZone is shrunk by that many meters, if you specify a negative inset (an outset) then the
alertZone is grown by that many metres.
Note. Insetting a polygon may have unexpected results, for example the polygon may become two polygons !
Note: An inset applied to a circular region is just added to the radius so why bother.
Note: Also insetting a polygon is relatively complex calculation don’t use it unless you need too (you are just being lazy) !
The file is processed in a secondary thread so it will not impact you too much, but it will slow down you phone !
An example is shown below, generated from Excel (you need to set the encoding, see Options -> General Tab->Web Options->Encoding Tab)
AlertZoneStart,,,
AlertZoneName,A name,,
AlertZoneCategory,A Category,,
AlertZoneActive, 1
AlertZoneVibrate, 0
AlertZonePriority,10,,
AlertZoneSleepTime,50.0,,
AlertZoneSize,60.0,,
AlertZoneInset,-30.0,,
AlertDistance,10.0
AlertZoneSoundName,homer,,
Location,1,10.5,123.4
Location,2,10.6,123.6
Location,3,10.7,123.8
Location,4,10.8,124.2
Location,5,10.6,124.4
AlertZoneEnd,,,
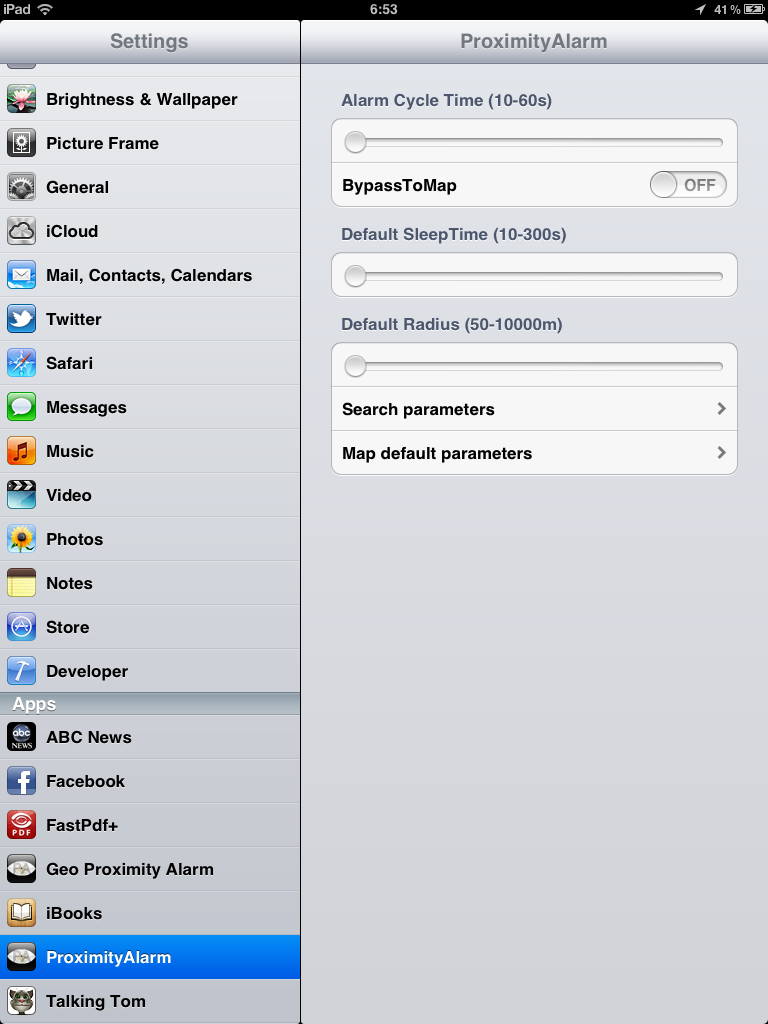
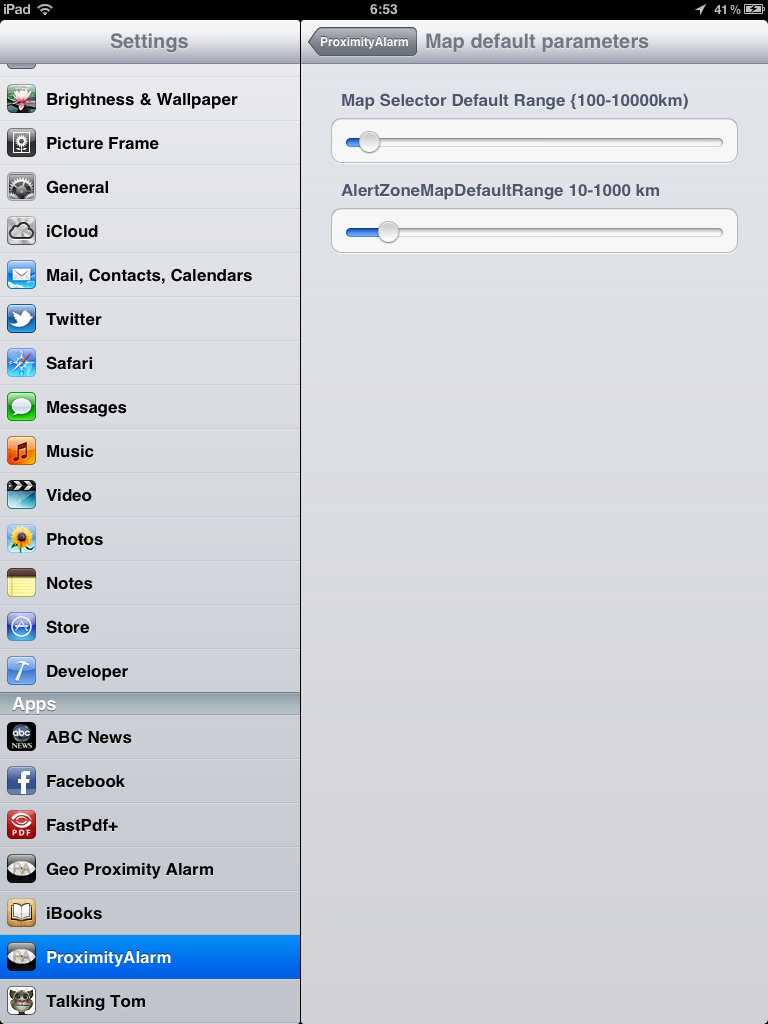
These parameters define a default range for the two map views,
The Map Selector View and Alert Zone Editor Map View have a there default range set.
Map Selector Default Range is 500km. This is typically only used the first time the view is opened.
The Map Selector View remembers the last range used thereafter
If Distance to Closest Alert Zone < Standard Threshold then
Use the Standard Location Service (most battery hungry)
Else If Distance to Closest Alert Zone < Significant Threshold then
Use the Significant Location Service (less battery hungry)
Use the Region Based Location Service (least Battery hungry).
Close Region Minium Distance specifies a lower bound for the size the search area for regions.